Windows Filesharing (Samba)

SMB/CIFS aka “Windows Filesharing”

Jan 2020: Due to the recent Ransomware attack which affected the School of SEMS, as a precautionary action we have DISABLED access via the SMB/CIFS protocol to group shares on the staff login-server ‘frank’, from the following networks:

  • Eduroam (Wifi)
  • EECS Self-Managed
  • ITS Self-Managed
  • VPN
  • Out-of-campus (Internet)

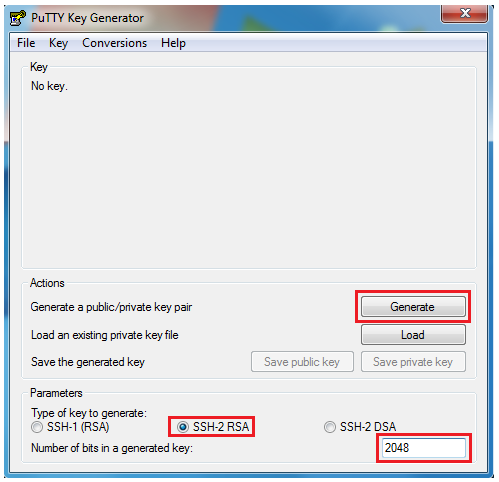
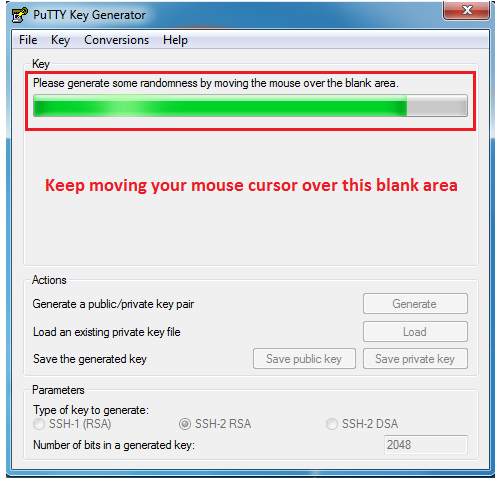
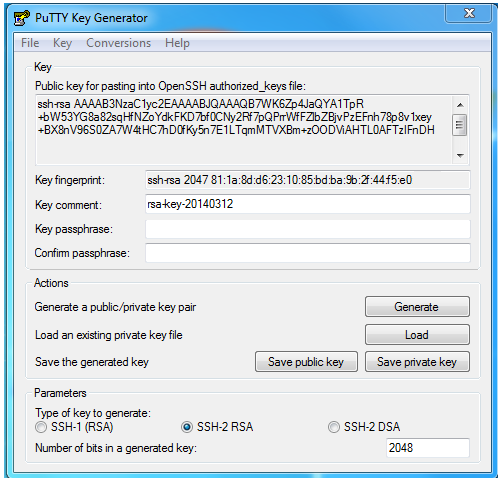
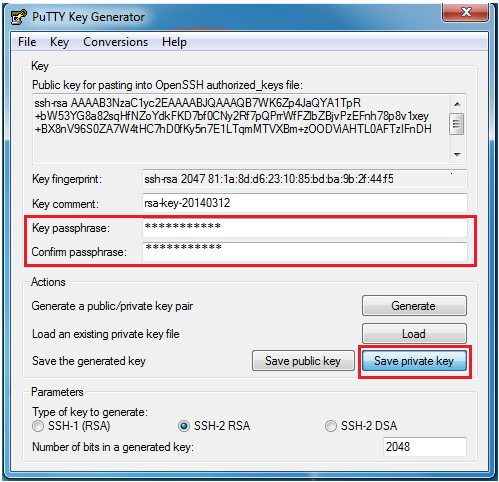
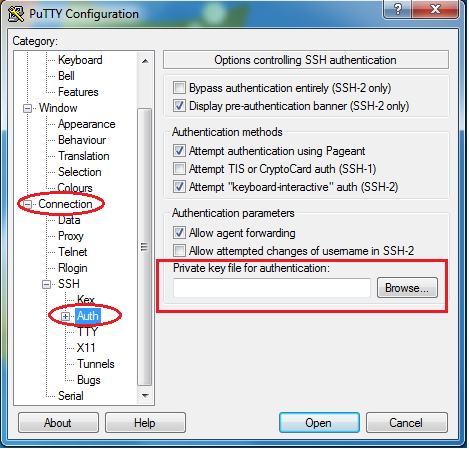
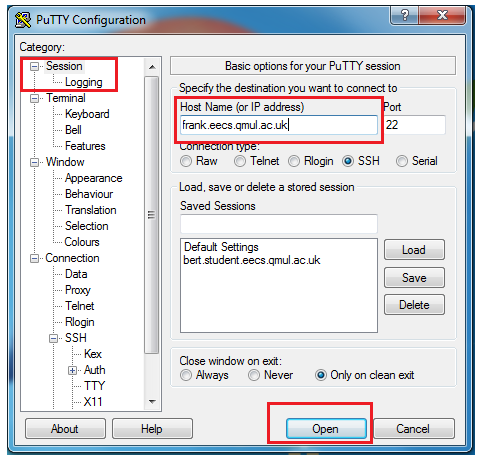
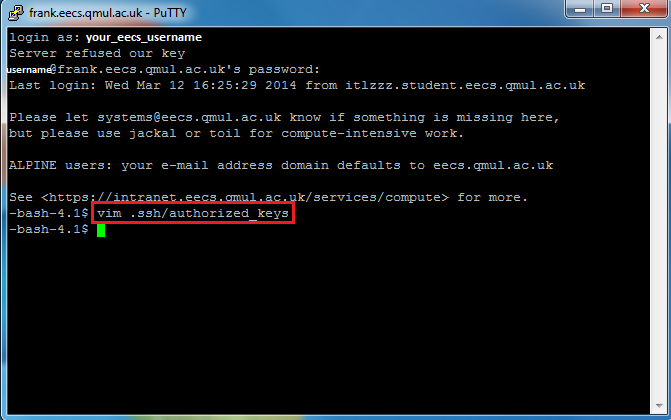
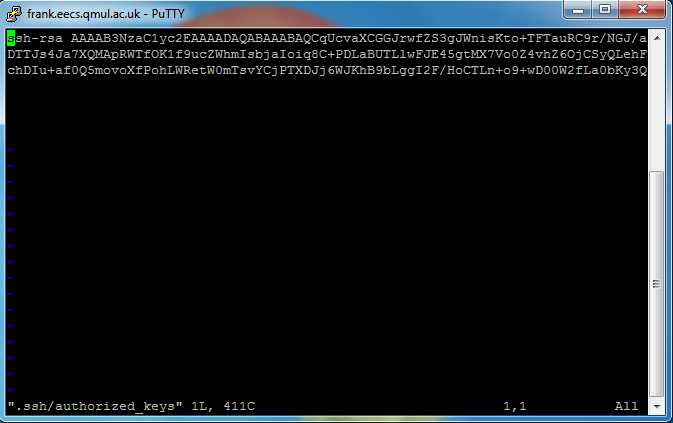
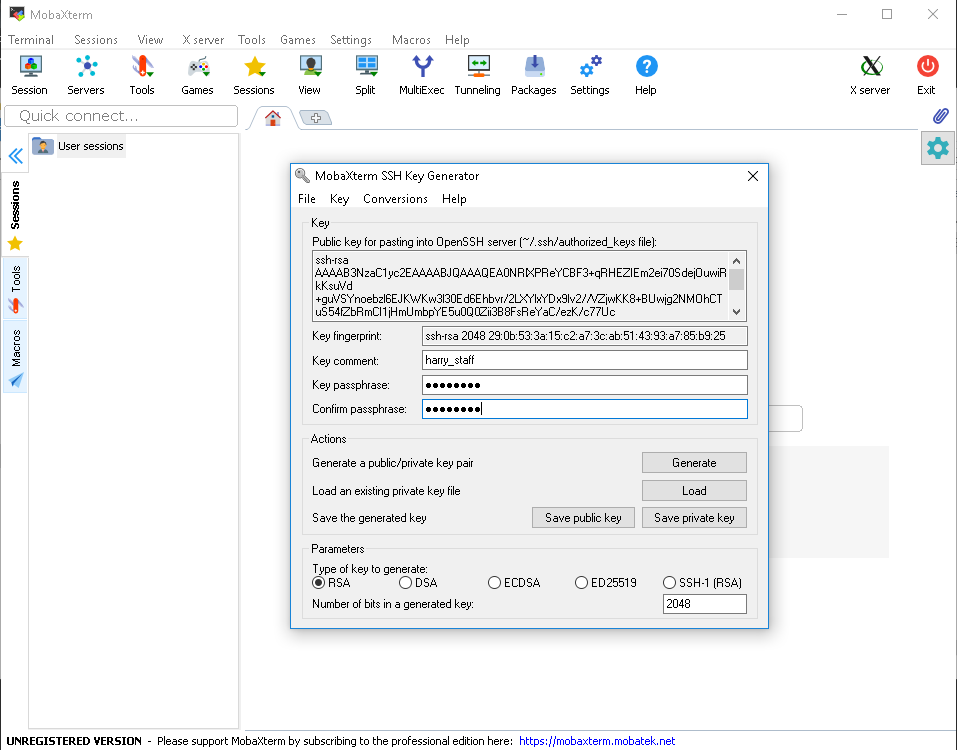
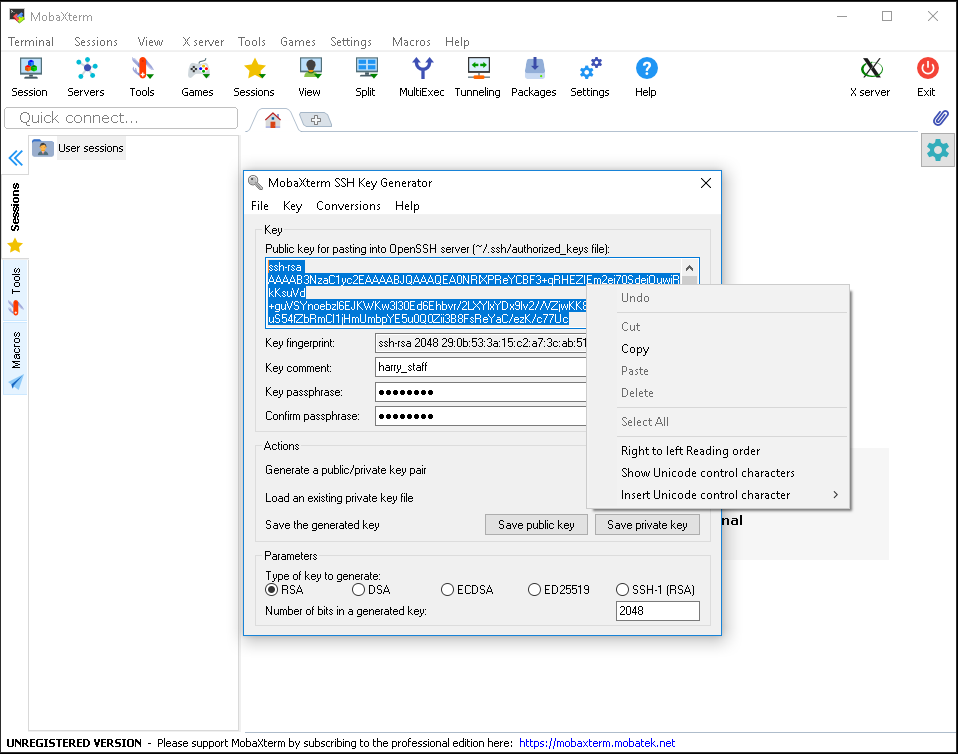
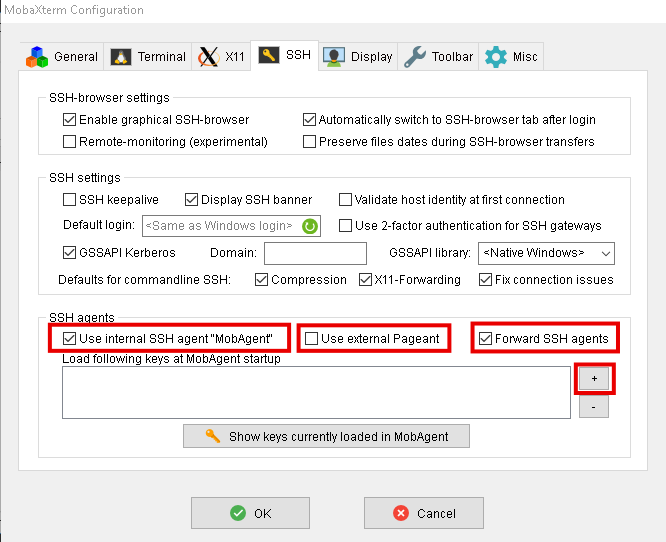
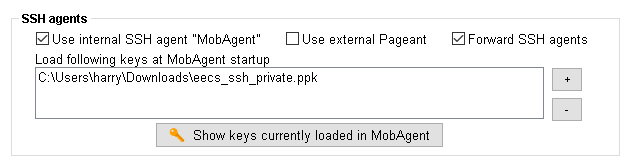
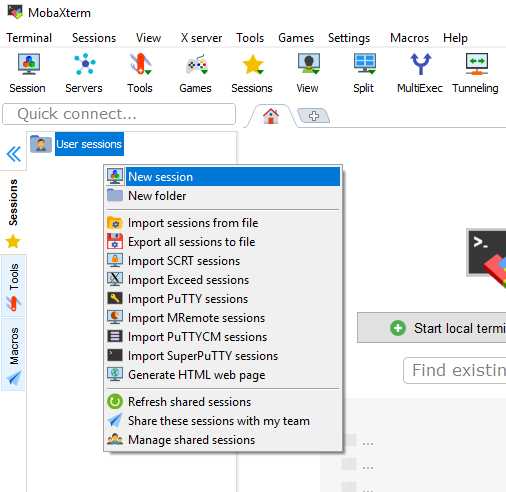
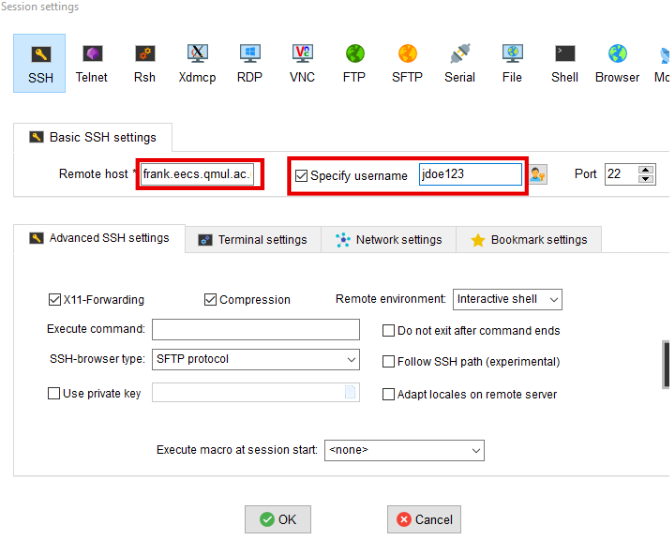
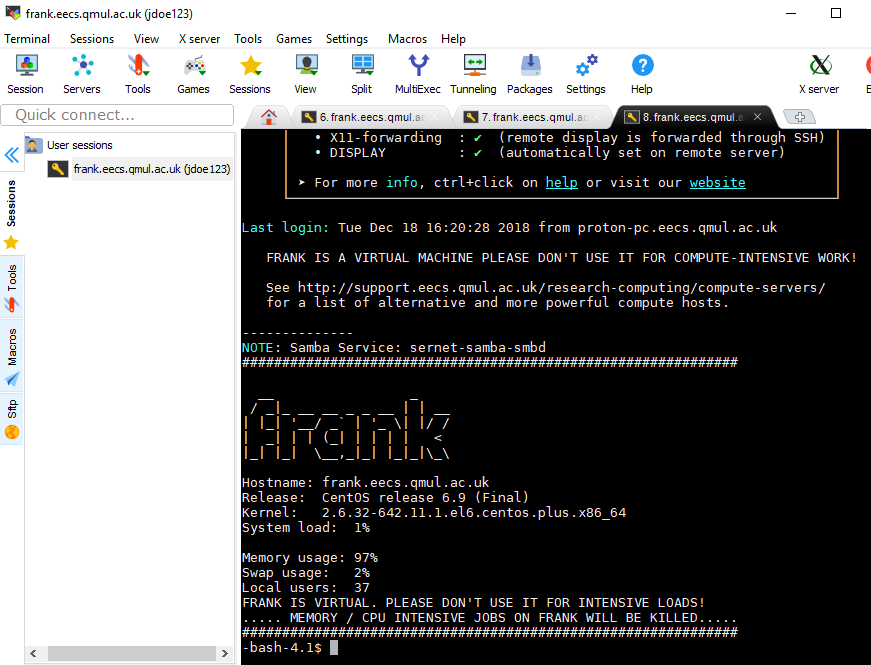
Access to group shares on frank is only allowed over the SSH or sFTP protocol on port 22, using one of the recommended software here: SFTP (Secure FTP)


Why did we do that?
Recent malware and ransomware attack vectors can affect, not only a personal client device, but also any network shares attached to them via SMB protocol. Blocking group shares over SMB protocol and using the SSH/sFTP protocol instead, reduces -if not eliminates- the security risks from any infected self-managed devices to also attack any Staff/Research group shares on the staff fileserver.


If you still need to read the old guide for SAMBA for personal usage, you can find it here:  http://support.eecs.qmul.ac.uk/services/smb-cifs-deprecated/

Scratch space

We offer scratch space (temporary disk space) for EECS MSc students when they the need to store a big amount of data for a short period of time. For example for Deep Learning projects, a big dataset might not fit in the student’s home directory (please see quotas).

The scratch space is NFS-based, exported over the network to all student desktops and student Compute servers. That means that if you add some data from a student desktop into your folder in the scratch space, it will be available when you SSH into a server.

The scratch space IS NOT being backed up , use it only as a temporary space for non critical data

Available scratch spaces (Students only)

Name Access Status
/import/scratch-01 MSc, Academics ONLINE
/import/scratch-02 MSc, Academics ONLINE
/import/scratch-03 MSc, Academics ONLINE
/import/scratch MSc, Academics OFFLINE (moved to /import/scratch-01)

How to request it

MSc students can request scratch space from EECS Systems by raising a Helpdesk Ticket , providing the following infromation:

  • Your Supervisor’s details
  • Your EECS username (your ITL login)
  • How much disk space you will require.

How to use it

The scratch disks are available under the ‘/import/’ folder from any EECS desktop/server . After the students request an additional scratch space, they will find a folder named after your EECS username and only they have access to that folder. The names and the status of the available scratch spaces are defined at the table bellow:


Disk Quota

Staff/PhD disk quotas

We apply disk quotas (limitats) for all Staff and Students’ home directories, in order to ensure the fair usage of our Fileservers resources from all users in EECS.
As of September 2018, after moving all staff/PhD to the new fileserver quotas are enabled as below.

Staff type Quota Hard Limit
PhD/Staff 80 GB 90 GB
You are advised to act upon receiving the email notification regarding your disk quota and clear any files you no longer need

How to check

In Linux, you can use the quota command to display your current quota usage:

[-bash-4.1]$ quota -s
Disk quotas for user jdoe123 (uid 012345):
     Filesystem   space   quota   limit   grace   files   quota   limit   grace
gouda:            4500M*  4000M    5000M   30      215k    0       0 
/export/user10

Here’s a quick explanation of these numbers:

  • space*: Your home directory is currently 4,4GB big. The asterisk * next to it means that you are exceeding the allocated ‘soft limit’ for your user, which is explained next.
  • quota:  This is the ‘soft limit’ for your user. If you have exceeded that limit, you must clear some files from your home directory before the ‘grace period’ expires.
  • limit: This is the ‘hard limit’. If you exceed that limit, you will not be able to create any new files. This will lead to a situation where you will not be able to log into a Linux desktop.
  • grace: The grace period, before the end of which you must clear some files from your home directory, if you have exceeded your ‘soft limit’.
  • files: The number of the files in your home directory.

If you have exceeded the allocated disk space (indicated by the small asterisk), read the FAQ page on how you can find any big files/folders to help you clean them up.


EECS Mailing Lists

Terms of use

The mailing lists detailed on this page are available to all staff and research students in the School.

Please DO REMEMBER to:

  • Use the correct mailing list for your intended recipients.
  • If there isn’t a list that targets just the right people, say in the first line who needs to read the rest.
  • Spend some effort composing your email: 1000 people simply reaching for the delete button is a lot of time wasted.
  • Make sure the subject line in particular is appropriate; never use a thread on one topic to begin a new one.
  • If you’re forwarding an email to a list, or replying to a message on one, it is polite to trim as much as possible from the text you quote.
  • Sign your email with your full name.

Please DO NOT USE the mailing lists for:

  • Commercial mailings.
  • Advertising personal items for sale.


Automated EECS Mailing Lists

All the EECS lists below use information from the School database to generate the list of recipients and as such are not manually updated. Many of the lists can only be used by a restricted set of users (e.g. EECS staff). To send to these lists, you must use your college Office 365 account and the EECS database must know the address that your messages are sent from. You can see the address that the EECS database has stored for you on your EECS about me page. If this is not the address that your messages are sent from then please email systems@lists.eecs.qmul.ac.uk to ask for this to be corrected. If a list is restricted to EECS staff only, then you need to ensure you have such a role in the database too.


Staff & research student lists

The restricted membership of the lists is to reduce email overload by making it possible to target your audience, not to enable confidential communications between the members of the list.

Members of the EECS “staff” permissions group have read access to these lists. Membership of this group is granted to EECS staff but may include people who’ve recently left. Access will also be granted to a few people not strictly in the School but whose work would benefit from being on these lists, for example our Business Development Manager in Queen Mary Innovation Ltd.

List Download Descripton
staff@lists.eecs.qmul.ac.uk CSV all School staff: lecturers, professors, research staff, support staff (admin, technical and systems support)
academic-staff@lists.eecs.qmul.ac.uk CSV academic staff: same as above without research staff. Support staff are included just so they don’t get taken by surprise by anything
professors@lists.eecs.qmul.ac.uk not available all professors in the School
residents@lists.eecs.qmul.ac.uk CSV staff, PhD students and guests working in any of the School buildings
resident-guests@lists.eecs.qmul.ac.uk CSV guests with desk space in School buildings
phd@lists.eecs.qmul.ac.uk CSV PhD students (including RAs still completing their PhD)
phd-mat@lists.eecs.qmul.ac.uk not available PhD students that are on the MAT programme
phd-non-mat@lists.eecs.qmul.ac.uk not available PhD students that are on a regular EECS (non MAT) programme.
research-staff@lists.eecs.qmul.ac.uk CSV Research Assistants, Fellows etc
admin@lists.eecs.qmul.ac.uk CSV Administrative support staff
research-admin@lists.eecs.qmul.ac.uk CSV Research related administrative staff
technical@lists.eecs.qmul.ac.uk CSV Technical support staff
teaching-staff@lists.eecs.qmul.ac.uk CSV All EECS staff involved with teaching a module (including non academics)
demonstrators@lists.eecs.qmul.ac.uk CSV All current module demonstrators (formerly teaching assistants)
advisors@lists.eecs.qmul.ac.uk not available All School staff that are student advisors
ug-advisors@lists.eecs.qmul.ac.uk not available All School staff that are undergraduate student advisors
msc-advisors@lists.eecs.qmul.ac.uk not available All School staff that are MSc. student advisors
ug-advisors-$y@lists.eecs.qmul.ac.uk not available All School staff that are advisors of undergraduate students in year $y
phd-supervisors-$s@lists.eecs.qmul.ac.uk not available All PhD supervisors and independent assessors for EECS research student $s. The student can be identified by either their EECS username or their 9 digit student code
mo-associates-sem1@lists.eecs.qmul.ac.uk not available All module organisers of EECS modules with any SEM1 only associate students in their modules
mo-associates-sem2@lists.eecs.qmul.ac.uk not available All module organisers of EECS modules with any SEM2 only associate students in their modules
mo-associates-year@lists.eecs.qmul.ac.uk not available All module organisers of EECS modules with any full year associate students in their modules


EECS research lists

These lists are also driven by data from the School database. For each group, there are also filtered variants such as c4dm-academic@lists.eecs.qmul.ac.uk, c4dm-ra@…, c4dm-phd@…c4dm-guest@… . There is also a variant, c4dm-primary@lists.eecs.qmul.ac.uk which only includes the people whose primary group is c4dm. These variants exist for all research groups.

The CSV files for these lists can be obtained using URLs like

List Download Descripton
antennas@lists.eecs.qmul.ac.uk CSV Members and affiliates of Antennas & Electromagnetics
c4dm@lists.eecs.qmul.ac.uk CSV Members and affiliates of the Centre for Digital Music
cogsci@lists.eecs.qmul.ac.uk CSV Members and affiliates of Cognitive Science
gameai@lists.eecs.qmul.ac.uk CSV Members and affiliates of Game AI
csr@lists.eecs.qmul.ac.uk CSV Members and affiliates of Communication Systems Research
ir@lists.eecs.qmul.ac.uk CSV Members and affiliates of Information Retrieval
mmv@lists.eecs.qmul.ac.uk CSV Members and affiliates of MMV
networks@lists.eecs.qmul.ac.uk CSV Members and affiliates of Networks & Telecomms
or@lists.eecs.qmul.ac.uk CSV Members and affiliates of Operational Research
radar@lists.eecs.qmul.ac.uk CSV Members and affiliates of RADAR
minds@lists.eecs.qmul.ac.uk CSV Members and affiliates of Machine Intelligence and Decision Systems (MInDS)
robotics@lists.qmul.ac.uk CSV Members and affiliates of Robotics
theory@lists.eecs.qmul.ac.uk CSV Members and affiliates of Theory
vision@lists.eecs.qmul.ac.uk CSV Members and affiliates of Vision


Location Based Mailing Lists

Lists are available to target all the people based in a particular room or building.

List Descripton
$r-occupants@lists.eecs.qmul.ac.uk Room based lists. The room name $r should the short version of the room name (e.g. ‘Eng104’ or ‘CS327’)
$b-occupants@lists.eecs.qmul.ac.uk Building based lists. The building $b can be one of ‘Engineering’,’PeterLandin’ or ‘ITL’


Taught Student Mailing Lists

NB. For Research Students, please see the staff lists.

All emails sent to the student mailing lists below are also copied to the shared mailbox eecs-student-lists@qmul.ac.uk.

The following lists are directly derived from our School database and are therefore exactly as up-to-date as the database. Membership of these lists is determined by an individual’s status within the School. The EECS web pages are derived from the same user databases.

The structure of these lists largely follows the custom and practice of the former Department of Electronic Engineering. We are using a new mail domain for these lists. They are all of the form list-name@lists.eecs.qmul.ac.uk The lists are defined by information in the School’s student record system which takes data from the College SRS and from the School’s own administrators. Messages to student lists can only be sent by staff. The School’s policy is that students should use the forums when they wish to communicate with other students. (SSLC representatives?). There are lots of lists. We’ll link to them from relevant parts of the School’s intranet(s).

Sites

In order to support distance learning and the Joint Programme as effectively as possible, messages can be restricted to students studying at a particular “site”.

We currently (October 2010) have the following sites:

Site Descripton
DLUK Distance Learning UK
MPI Macau Polytechnic Institute
QMUL Queen Mary, University of London
BUPT Beijing University of Posts and Telecommunications

There are a small number of purely site-based lists. These do not include students resitting in absentia.

$s@lists.eecs all students currently based at site $s
$s-$y@lists.eecs all students currently based at site $s in developmental year $y

Examples: mpi@lists.eecs.qmul.ac.uk (students studying at Macau Polytechnic Institute).

Modules

For each module $m offered by the School, we have the following lists:

$m@lists.eecs all students registered for {the exam} module $m this academic year + all relevant lecturers and TAs
$m-resit@lists.eecs the subset of $m that are resitting, including in absentia, + relevant lecturers and TAs
$m-attend@lists.eecs the subset of $m that are in attendance at QMUL (thus excluding resits and DL) + relevant lecturers and TAs
$m-$s@lists.eecs the subset of $m that are studying in semester $s + relevant lecturers and TAs (semester can be SEM1, SEM2 etc.)
$m-sms@lists.eecs email->SMS gateway.the same students as $m-attend, but SMS to their mobile numbers if in db or email otherwise + relevant lecturers and TAs
$m-staff@lists.eecs the lecturers and TAs teaching module $m

Examples:
ecs701p@lists.eecs.qmul.ac.uk (students registered on ECS701P)
ecs701@
lists.eecs.qmul.ac.uk (students registered on all variants of ECS701)

Programme Routes

The College SIS no longer uses the old Programme of Study codes, so the related lists have been withdrawn. The new route codes are the closest equivalent and so lists of students per route are available

$r@lists.eecs all enrolled students registered on route $r this academic year
$r-$y@lists.eecs all enrolled students in developmental year $y registered on route $r this academic year
$r-$s@lists.eecs all enrolled students at site $s registered on route $r this academic year

Examples:
USICT-2@lists.eecs.qmul.ac.uk (2nd year students registered on the USICT route – Information and Communications Technology)
UMTEGMAN-QMUL@lists.eecs.qmul.ac.uk (JP students registered on the UMTEGMAN route but located at QMUL)

Progression Years

These do not include students resitting in absentia.

year-$y@lists.eecs all EECS campus+DL (not JP in Beijing) students registered on any programme in developmental year $y
finalists@lists.eecs all EECS final-year campus+DL (not JP in Beijing) students registered on any u/g programme
ee-ug-finalists@lists.eecs all final-year campus+DL (not JP in Beijing) students registered on any EE u/g programme
cs-ug-finalists@lists.eecs all final-year campus+DL students registered on any CS u/g programme
masters-year-$y@lists.eecs all EECS campus+DL (not JP in Beijing) students in developmental year $y on any masters u/g programme (i.e. MEng and MSci programmes)
ee-ug-$y@lists.eecs as ee-ug (see below) for those students in developmental year $y
cs-ug-$y@lists.eecs as cs-ug (see below) for those students in developmental year $y
ee-msc-$y@lists.eecs as ee-msc (see below) for those students in developmental year $y
cs-msc-$y@lists.eecs as cs-msc (see below) for those students in developmental year $y
non-eecs-$y@lists.eecs as non-eecs (see below) for those students in developmental year $y

Example: ee-ug-3@lists.eecs.qmul.ac.uk (undergraduates in dev year 3, registered for any EE programme of study)

EECS, EE, CS, etc

These do not include students resitting in absentia.

ug@lists.eecs all u/g (not JP in Beijing) registered on any EE/CS programme in the current academic year
msc@lists.eecs all msc registered on any EE/CS programme in the current academic year
ug-by-module@lists.eecs all u/g (not JP in Beijing) registered on any EE/CS module in the current academic year
msc-by-module@lists.eecs all msc registered on any EE/CS module in the current academic year
ee-ug@lists.eecs all u/g (not JP in Beijing) registered on any EE programme in the current academic year
cs-ug@lists.eecs all u/g registered on any CS programme in the current academic year
ee-msc@lists.eecs all msc registered on any EE programme in the current academic year
cs-msc@lists.eecs all msc registered on any CS programme in the current academic year
non-eecs@lists.eecs all students from other departments/schools registered for at least 1 EECS module in the current academic year


Students Currently out of Attendance

resit-$r@lists.eecs all students resitting in absentia who have a role of $r (‘ug’, ‘msc’ or ‘phd’)
resit-$y@lists.eecs undergraduate students resitting in absentia who are in development year $y
interrupted-$r@lists.eecs all students who have currently interrupted their studies and have a role of $r (‘ug’, ‘msc’ or ‘phd’)
interrupted-$y@lists.eecs undergraduate students who have currently interrupted their studies and are in development year $y

Example: resit-2@lists.eecs.qmul.ac.uk (second year students on an EECS programme that are currently resitting in absentia)

MAT Students

Lists of students who started the MAT programme by their entry year

mat-students-$y@lists.eecs all MAT students who started the programme in year $y

Example: mat-students-2010@lists.eecs.qmul.ac.uk

Project Students

Lists of students who are currently enrolled on projects in EECS (project module code based lists can also be used where appropriate)
$p refers to a type of project (‘ug’, ‘msc’, ‘jp’, or ‘team’)

project-students-$p@lists.eecs all students registered on an EECS project $p in the current academic year

Example: project-students-ug@lists.eecs.qmul.ac.uk (all current undergraduate project students in EECS)

Advisees and Project Supervisees

$l refer to a advisor’s or lecturer’s EECS username (e.g. edmundr, marks, …)
$p refers to a type of project (‘ug’, ‘msc’, or ‘jp’)

advisees-$l@lists.eecs all advisees of lecturer $l + lecturer
advisees-ug-$l@lists.eecs all undergraduate advisees of lecturer $l + lecturer
advisees-ug-$l-$y@lists.eecs all undergraduate advisees of lecturer $l in year $y + lecturer
advisees-msc-$l@lists.eecs all MSc. advisees of lecturer $l + lecturer
project-students-$l@lists.eecs all project students supervised by lecturer $l + lecturer
project-students-$p-$l@lists.eecs all students registered on a project $p supervised by lecturer $l + lecturer

Examples:
advisees-ug-tassos-3@lists.eecs.qmul.ac.uk (Tassos’s third-year undergraduate advisees)
project-students-ug-tassos@lists.eecs.qmul.ac.uk (Tassos’s undergraduate project students)


SSH Tunnelling

How to pretend your browser is on an EECS network

When all else fails, you can make an SSH tunnel from your home computer (call it C for “client”) to a computer on the School network (call it W). The idea is that you ask application software on C to connect to a port on itself; SSH is listening for this connection and forwards it to W. W, in turn, forwards the request to the server that you’d really like to talk to (call it S).

On your Linux or MacOS X box or Cygwin on Windows (i.e., whatever the “client” computer that you’re sitting in front of), type the following ssh command in an xterm or Terminal window:

 ssh -NfL 9000:S:port W

[ If you’re using one of the other Windows SSH programs, you can set up the port forwarding in the settings GUI]

‘W’ will typically be frank.eecs.qmul.ac.uk (if you’re staff). ‘port’ will be the usual port for the service, e.g. 80 if it’s a web server you want to talk to. ‘S’ will be the server providing the service, e.g. tomcat-stu for the student Apache server, or qm-web.qmul.ac.uk for the College intranet.

Example

 ssh -NfL 9000:webprojects:80 frank.eecs.qmul.ac.uk

makes a tunnel from your client computer to webprojects, via bert, after which the URL

 http://127.0.0.1:9000/

entered into the web browser on your client computer will show you tomcat-stu’s web server.

Example: how to pretend your browser is on an EECS network

You can tunnel to a web proxy wwwcache.eecs.qmul.ac.uk to cause your web browser’s requests to appear to come from the School networks. This is useful for some sites, eg The Apple Store for the National Higher Education Agreement.

 ssh -NfL 3128:wwwcache:3128 frank.eecs.qmul.ac.uk

This makes a tunnel from localhost on port 3128 via bert to wwwcache.eecs.qmul.ac.uk:3128. Now all you need to do is point your browser’s proxy setting to localhost on port 3128, and you’ll be able to buy a MacBook for less.

Windows Filesharing (Samba) – DEPRECATED

SMB/CIFS aka “Windows Filesharing”

Jan 2020: Due to the recent Ransomware attack which affected the School of SEMS, as a precautionary action we have DISABLED access via the SMB/CIFS protocol to group shares on the staff login-server ‘frank’, from the following networks:

  • Eduroam (Wifi)
  • EECS Self-Managed
  • ITS Self-Managed
  • VPN
  • Out-of-campus (Internet)
Access to group shares on frank is only allowed over the SSH or sFTP protocol on port 22.
NOTE: Staff/PhD and students will need to be connected to OpenVPN to use Windows Filesharing. Please see here for instructions to install and setup OpenVPN access.

Using SMB with Linux

Recent Linux GNOME and KDE client desktops can understand smb:// URIs for drag-and-drop file transfer.

An older method is to use smbclient to transfer files to and from your home directory:

  • Research/Staff: smbclient //frank.eecs.qmul.ac.uk/YOUR-USERNAME -U YOUR-USERNAME
  • Students: smbclient //login.student.eecs.qmul.ac.uk/YOUR-USERNAME -U YOUR-USERNAME

Make sure that the following settings are added to the [global] section of your /etc/samba/smb.conf:

client min protocol = SMB3_02
client max protocol = SMB3_11


Since 2017, only samba versions 4.3 and above are supported.

Using SMB with Mac OS X

Use the Finder‘s Go menu, and choose Connect To Server…. Enter one of the following URLs:

  • staff: smb://frank.eecs.qmul.ac.uk/YOUR-USERNAME
  • students: smb://bert.student.eecs.qmul.ac.uk/YOUR-USERNAME

NOTE: Only OS X Maverics or above are supported.

Using SMB with Windows

Right-click on My Computer and choose Map Network Drive. You will need to enter a path to the share:

  • for staff: \\frank.eecs.qmul.ac.uk\YOUR-USERNAME
  • for students: \\bert.student.eecs.qmul.ac.uk\YOUR-USERNAME
NOTE: Only Windows 8.1 or above are supported.

NB. SMB traffic is restricted to the college networks. If you want to use it outside those networks please connect to the VPN first, or use SFTP.

SSH (FOR EECS Staff/PhDs Only)

ATTENTION: PLEASE MAKE SURE YOUR PRIVATE KEYS ARE ENCRYPTED

follow this link to find for information to secure your keys, if you haven’t done so already, otherwise please read on, this guide will show you how to do that.
—————————————————————

Access to EECS Compute Servers is achieved with SSH-key authentication (known as passwordless authentication). Password-based access is not allowed, for security purposes, on the EECS compute servers.

Only the login-servers allow access using both the EECS password and SSH-key authentication.


SSH Keys

You will need to generate your SSH-key pair:

  • A Private key, which will be located in your personal device and will be used for SSH connections.
  • A Public key, which will be located on the remote server, in the ~/.ssh/authorized_keys file. The public keys included in that file will be checked against the private key you are using to connect to the server.

From any Managed Desktop you can ssh into computer servers directly, given that you have setup your SSH keys according to the instructions as detailed bellow.

From self-managed devices or from outside the University, you have to log into the login-server and then ‘hop’ onto the compute servers. It is important to forward your SSH key in this case, so make sure that your SSH agent is forwarding from your personal device.

In the following step, you will generate the private-public key pair and copy the public key to the remote server. Select your OS from the tabs to show the guide:

Windows

Two of the tools you can use in Windows are:

PuTTY:

For Windows users, PuTTYgen is a ssh key generator application.

SSH Key generation

1. Open PuTTYgen application if you’ve installed it already (or) download it from here.

2. Launch the PuTTYgen application.

3. Review key generation parameters. Our recommendation is SSH-2 RSA keys at 2048 bit encryption (see below). Fill in the details and press ‘Generate’.

puttygen1

4. You will now be presented with a screen like below. Move your mouse cursor in the blank area below the task progression bar to generate some randomness.

puttygen2

5. Your screen will look like below when the keys are generated:

puttygen3

6. Save the Public key, give a relevant name for your key in the ‘Key comment‘ text box, like your username for example. You can save the public key in a safe location in your computer.

7. Save your Private key. Before saving the private key, you SHOULD provide a ‘Key passphrase’ for added security.
Save the private key in the same location as your public key. Choose the filename for the private key but the ‘.ppk‘ extension should be retained as it is.

puttygen5

Do not close PuTTYgen. Not yet!

Copy SSH Public Key to remote server

1. Select and copy the public key from the text field (see below) and paste the contents into Notepad (or any text editor). Save the file with an appropriate filename (e.g., publickey.txt) in a location you’d easily remember.

puttygen6

2. Launch PuTTY

3. In the ‘Category‘ side bar in PuTTY client, navigate to ‘Connection -> Auth’, and then, browse for the private key (.ppk) you saved previously. Press ‘Open‘. The text field will now be populated with the path to your private key.

puttygen8

4. Then, navigate to ‘Category -> Session -> Host Name‘ and enter name of the remote server you’d like to connect to:

puttygen7

5. Enter the username and password credentials for logging into the remote server, and then type:

$ vim .ssh/authorized_keys

to access the list of authorized keys on the remote host. (You can use nano/emacs editors instead of vi/vim, too)

puttygen9

6. When you’ve opened the list of authorized_keys in the remote host, it will look something like below:

puttygen10

7. To this file, copy and paste the contents of the publickey.txt file saved previously (see step 1). Save the ‘authorized_keys‘ file, log out of the remote host and close PuTTY.

SSH agent forwarding

PuTTY uses its own SSH agent, called ‘pageant‘, which will be used for the ‘SSH agent forwarding’.
You will find the executable file in PuTTY’s installation folder. (C:\Program Files\PuTTY).

1. Double click on ‘pageant’, it will open in the system tray (bottom right corner). Open it.

pageant_1

2. Click ‘Add Key’. Find your Private key and click ‘Open’. If you protected your SSH key with a passphrase, you will be asked to enter it.

3. Your SSH key is now loaded on the SSH agent.
pageant_2

Pageant is now running in the background.

NOTE: Going forward, whenever you try to access the remote-host (to which you’ve copied your public ssh key) using PuTTY, you’d be able to login without providing your password. You’d only have to enter your username and passphrase (provided when setting up your ssh key pair) to login.

NOTE: You will ONLY be able to copy your public key to frank (staff/PhD) and not to other compute servers (e.g., canterbury). However, once you’ve copied your public key to frank, you’d then be able to hop on to other compute servers from there.

Mobaxterm

MobaXterm is a recommended free X server and SSH client for Windows, as an alternative to PuTTY. You can download the Home edition here:

https://mobaxterm.mobatek.net/download-home-edition.html

It has its own SSH-key generation tool and its own internal SSH agent, which can be used to forward your SSH keys.

SSH Key generation

1. Open MobaXterm and go to ‘Tools -> MobaKeyGen (SSH key generator)‘.

moba_1

2. Click ‘Generate‘ and move your mouse cursor in the big empty field until the green bar at the top indicates that it is complete.

moba_2

3. Add a relevant comment at the ‘Key comment‘ box and add a ‘Key passphrase‘ to protect your SSH keys.
Click at ‘Save private key‘ and select a location to save your private key.

moba_3

4. Copy your public key from the ‘Public key’ box and paste it into a notepad. Save it in the same folder with your Private key. This will be copied later to the remote server.

moba_5


SSH-agent

Enable the native SSH agent and append your private key to be loaded automatically. Go to ‘Settings -> Configuration -> SSH‘.

Check the ‘Use internal SSH agent “MobAgent” ‘ and untick the ‘Use external Pageant‘ box.

moba_agent_2

Click the ‘+‘ key at the right side, select your private key and click ‘Open‘. You will the key listed in the white box. Click ‘OK‘. Now your private key will be loaded automatically when you start MobaXterm.

moba_agent_4

Restart MobaXterm if you are asked.


SSH session

If you have completed the above necessary steps, create a new session.

1. On the main screen, open the ‘Sessions‘ tab at the left, right click in the empty area and select ‘New session‘.

moba_session_1

2. Click at the ‘SSH’ button, fill the name of the remote server at the ‘Remote host‘ field, and your EECS username at the ‘Specify username‘ field. Click ‘OK’.

moba_session_2

3. Double-click on the new session, this will SSH you into the remote server without entering your password.

moba_session_3

Optional: If you’re using one of the ‘login servers’ to hop on to an EECS compute server, type the following command the check if your SSH agent has forwarded your SSH key in the new session:

[jdoe123@frank] $ ssh-add -L


Linux

Terms

ssh-keygen : Creates the public-private key pair.

ssh-copy-id :Copies the public key into the remote server’s .ssh/authorized_keys file.

ssh-add -l : Lists the SSH-keys in the current connection

Key generation

1. Open a Terminal, type the following command and press enter:

ssh-keygen

2. Follow the instructions to generate the private/public key pair.
Press Enter at the “Enter file in which to save the key” part to create a key using the default name and path.
NOTE: Add a passphrase for security reasons.

$ ssh-keygen 
Generating public/private rsa key pair.
Enter file in which to save the key (/home/harry/.ssh/id_rsa): 
Enter passphrase (empty for no passphrase): ***********
Enter same passphrase again: ***********
Your identification has been saved in /home/harry/.ssh/id_rsa.
Your public key has been saved in /home/harry/.ssh/id_rsa.pub.
The key fingerprint is:
SHA256:dFLmbsDRF7c6accolFOxILVyyxPTCGshT55Uwn54FS8 harry@local-desktop
The key's randomart image is:
+---[RSA 2048]----+
|      ..O+* =+.  |
|       B.%.Bo+ . |
|       .%.%oE o  |
|       ooXo= *   |
|        SoB * o  |
|         . + o   |
|                 |
|                 |
|                 |
+----[SHA256]-----+


From that message you understand that your SSH key pair has been generated:

Private key : /homes/USERNAME/.ssh/id_rsa
Public key: /homes/USERNAME/.ssh/id_rsa.pub

4. Copy public key
Provided you have a QMUL IT account you can add your keys at https://support.eecs.qmul.ac.uk/ssh, if you do not please contact servicedesk@qmul.ac.uk with your public key for the EECS cluster and we will get back to you as quickly as possible.

SSH access

SSH into the server with your keys to make sure it works. If you used a passphrase for your SSH keys, then you’ll be prompted to enter that.

 
$ ssh -i ~/.ssh/id_rsa EECS_USERNAME@LOGIN_SERVER
If the user Joe Doe with EECS Username jdoe123 wants to copy the public key to the server frank.eecs.qmul.ac.uk, he will use:

$ ssh -i ~/.ssh/id_rsa jdoe123@frank.eecs.qmul.ac.uk

MacOS

The instructions for MacOS are the same with Linux to generate and copy the SSH keys, so please follow the Linux  guide.

2018-NOTE: We’ve noticed a BUG in  ‘High Sierra‘  and later, where the ssh key is not being forwarded properly. The solution to that is :

  1. Manually add your Private key
  2. Confirm it’s loaded
  3. SSH into the remote server and check that your SSH key has been forwarded, like:

$ ssh-add ~/.ssh/id_rsa
$ ssh-add -L
$ ssh jdoe123@frank.eecs.qmul.ac.uk -A

[jdo123@frank] $ ssh-add -L


SSH Agent Forwarding

NOTE: If you try to access an EECS Compute Server via a login-server,  you must enable your SSH agent forwarding. To do that on a terminal, append the ‘-A‘ flag at the end of the ssh command, for example:

$ ssh -i ~/.ssh/id_rsa jdoe123@frank.eecs.qmul.ac.uk -A

To confirm that your key is present when you SSH into the login server, type:

[jdoe123@frank] $ ssh-add -L

If your agent forwarding worked fine, the result will be the content of the Public key being used to authenticate against your Public key, for example:

[jdoe123@frank] $ ssh-add -L
ssh-rsa AAAAB3NzaC1yc2EAAAADAQABAAABAQDYSaRizDUt87d8gh8sg78DGHGDGHd8hs87h8hd8sGnAHmYSLrnR4+4DxQH7agZXzgkb4ShlBbB5TfDDhYJMYBMPvjNW7HC8cgycfduNNz0sV1WbQ1GZ5phRw34THM8E6MPnhL/DbqQMe6DOA9+yegsgAQYHo9wE35BSa6hx6UmymuM+nn2M98CrJ /home/jdoe123/.ssh/id_rsa

If you see anything else like a ‘The agent has no identities.’ message, that means you did sth wrong, so read the previous instructions again, step by step.

Add ssh keys to server

Provided you have a QMUL IT account you can add your keys at https://support.eecs.qmul.ac.uk/ssh, if you do not please contact servicedesk@qmul.ac.uk with your public key for the EECS cluster and we will get back to you as quickly as possible.

Student Printing

These instructions do not apply to EECS PhD students.

Student printing is provided supported by QMUL IT Services.

General information on student printing can be found here.

To print from an EECS Student PC in the labs (ITL, Electronics Lab) :

  • If you are on Windows, use the printers named konicacolour or konicabw
  • If you are on Linux, use the printer named KONICA_RELEASE_ITL

To print from your own laptop/ device visit https://eprint.stu.qmul.ac.uk. Please log in with your QM account, i.e. the one you use for your e-mail. Further information on this service is provided here.

You will need to register your student card to be able to release jobs, as explained on this page.