SSH Tunnelling

How to pretend your browser is on an EECS network

When all else fails, you can make an SSH tunnel from your home computer (call it C for “client”) to a computer on the School network (call it W). The idea is that you ask application software on C to connect to a port on itself; SSH is listening for this connection and forwards it to W. W, in turn, forwards the request to the server that you’d really like to talk to (call it S).

On your Linux or MacOS X box or Cygwin on Windows (i.e., whatever the “client” computer that you’re sitting in front of), type the following ssh command in an xterm or Terminal window:

 ssh -NfL 9000:S:port W

[ If you’re using one of the other Windows SSH programs, you can set up the port forwarding in the settings GUI]

‘W’ will typically be frank.eecs.qmul.ac.uk (if you’re staff). ‘port’ will be the usual port for the service, e.g. 80 if it’s a web server you want to talk to. ‘S’ will be the server providing the service, e.g. tomcat-stu for the student Apache server, or qm-web.qmul.ac.uk for the College intranet.

Example

 ssh -NfL 9000:webprojects:80 frank.eecs.qmul.ac.uk

makes a tunnel from your client computer to webprojects, via bert, after which the URL

 http://127.0.0.1:9000/

entered into the web browser on your client computer will show you tomcat-stu’s web server.

Example: how to pretend your browser is on an EECS network

You can tunnel to a web proxy wwwcache.eecs.qmul.ac.uk to cause your web browser’s requests to appear to come from the School networks. This is useful for some sites, eg The Apple Store for the National Higher Education Agreement.

 ssh -NfL 3128:wwwcache:3128 frank.eecs.qmul.ac.uk

This makes a tunnel from localhost on port 3128 via bert to wwwcache.eecs.qmul.ac.uk:3128. Now all you need to do is point your browser’s proxy setting to localhost on port 3128, and you’ll be able to buy a MacBook for less.
Windows Filesharing (Samba) – DEPRECATED

SMB/CIFS aka “Windows Filesharing”

Jan 2020: Due to the recent Ransomware attack which affected the School of SEMS, as a precautionary action we have DISABLED access via the SMB/CIFS protocol to group shares on the staff login-server ‘frank’, from the following networks:

  • Eduroam (Wifi)
  • EECS Self-Managed
  • ITS Self-Managed
  • VPN
  • Out-of-campus (Internet)
Access to group shares on frank is only allowed over the SSH or sFTP protocol on port 22.
NOTE: Staff/PhD and students will need to be connected to OpenVPN to use Windows Filesharing. Please see here for instructions to install and setup OpenVPN access.

Using SMB with Linux

Recent Linux GNOME and KDE client desktops can understand smb:// URIs for drag-and-drop file transfer.

An older method is to use smbclient to transfer files to and from your home directory:

  • Research/Staff: smbclient //frank.eecs.qmul.ac.uk/YOUR-USERNAME -U YOUR-USERNAME
  • Students: smbclient //login.student.eecs.qmul.ac.uk/YOUR-USERNAME -U YOUR-USERNAME

Make sure that the following settings are added to the [global] section of your /etc/samba/smb.conf:

client min protocol = SMB3_02
client max protocol = SMB3_11


Since 2017, only samba versions 4.3 and above are supported.

Using SMB with Mac OS X

Use the Finder‘s Go menu, and choose Connect To Server…. Enter one of the following URLs:

  • staff: smb://frank.eecs.qmul.ac.uk/YOUR-USERNAME
  • students: smb://bert.student.eecs.qmul.ac.uk/YOUR-USERNAME

NOTE: Only OS X Maverics or above are supported.

Using SMB with Windows

Right-click on My Computer and choose Map Network Drive. You will need to enter a path to the share:

  • for staff: \\frank.eecs.qmul.ac.uk\YOUR-USERNAME
  • for students: \\bert.student.eecs.qmul.ac.uk\YOUR-USERNAME
NOTE: Only Windows 8.1 or above are supported.

NB. SMB traffic is restricted to the college networks. If you want to use it outside those networks please connect to the VPN first, or use SFTP.

Meeting Rooms

A number of Meeting Rooms is available in EECS, which can be used for meetings and Viva presentations.

Room Location TV
PC
Video cables avail
CS 308 CS, 3rd Floor Yes Yes HDMI,
CS Pod CS, 4th Floor No
CS 401 CS, 4th Floor
ITL Meeting Room ITL, Middle Floor Yes Yes VGA, HDMI
ITL Seminar Room ITL, Top Floor
Pod ‘Lovelace’ ITL, Ground Floor Yes Yes HDMI
Pod ‘Turin’ ITL, Ground Floor Yes Yes HDMI
Eng 101a Eng, 1st Floor
Eng 350 Eng, 3rd Floor Yes HDMI

SSH (FOR EECS Staff/PhDs Only)

ATTENTION: PLEASE MAKE SURE YOUR PRIVATE KEYS ARE ENCRYPTED

follow this link to find for information to secure your keys, if you haven’t done so already, otherwise please read on, this guide will show you how to do that.
—————————————————————

Access to EECS Compute Servers is achieved with SSH-key authentication (known as passwordless authentication). Password-based access is not allowed, for security purposes, on the EECS compute servers.

Only the login-servers allow access using both the EECS password and SSH-key authentication.


SSH Keys

You will need to generate your SSH-key pair:

  • A Private key, which will be located in your personal device and will be used for SSH connections.
  • A Public key, which will be located on the remote server, in the ~/.ssh/authorized_keys file. The public keys included in that file will be checked against the private key you are using to connect to the server.

From any Managed Desktop you can ssh into computer servers directly, given that you have setup your SSH keys according to the instructions as detailed bellow.

From self-managed devices or from outside the University, you have to log into the login-server and then ‘hop’ onto the compute servers. It is important to forward your SSH key in this case, so make sure that your SSH agent is forwarding from your personal device.

In the following step, you will generate the private-public key pair and copy the public key to the remote server. Select your OS from the tabs to show the guide:

Windows

Two of the tools you can use in Windows are:

PuTTY:

For Windows users, PuTTYgen is a ssh key generator application.

SSH Key generation

1. Open PuTTYgen application if you’ve installed it already (or) download it from here.

2. Launch the PuTTYgen application.

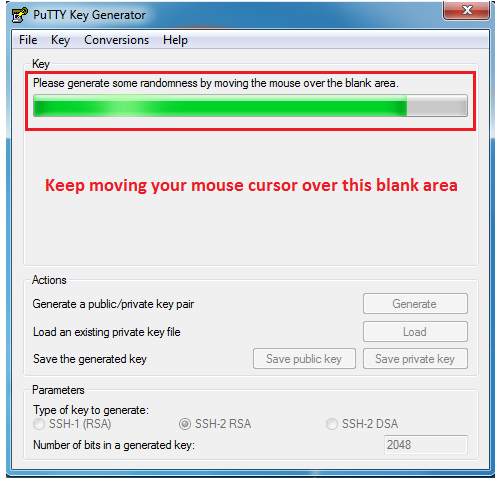
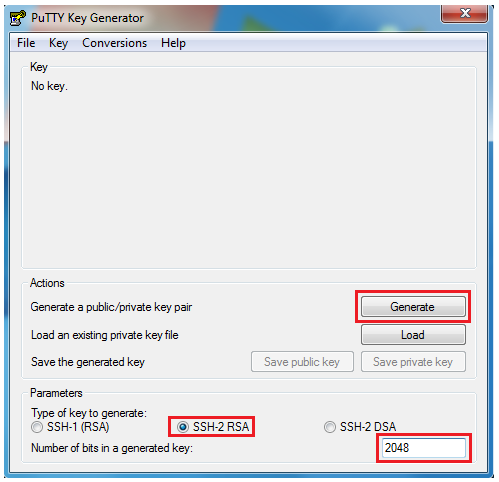
3. Review key generation parameters. Our recommendation is SSH-2 RSA keys at 2048 bit encryption (see below). Fill in the details and press ‘Generate’.

puttygen1

4. You will now be presented with a screen like below. Move your mouse cursor in the blank area below the task progression bar to generate some randomness.

puttygen2

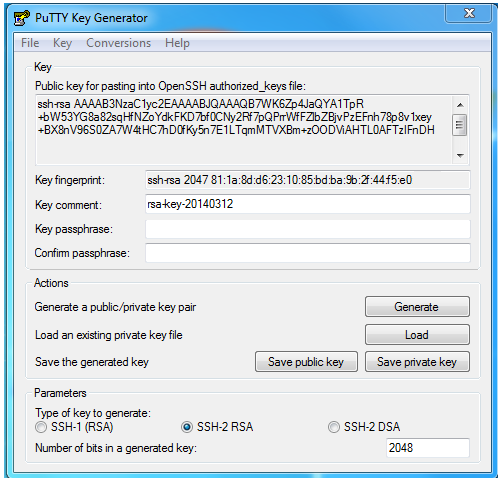
5. Your screen will look like below when the keys are generated:

puttygen3

6. Save the Public key, give a relevant name for your key in the ‘Key comment‘ text box, like your username for example. You can save the public key in a safe location in your computer.

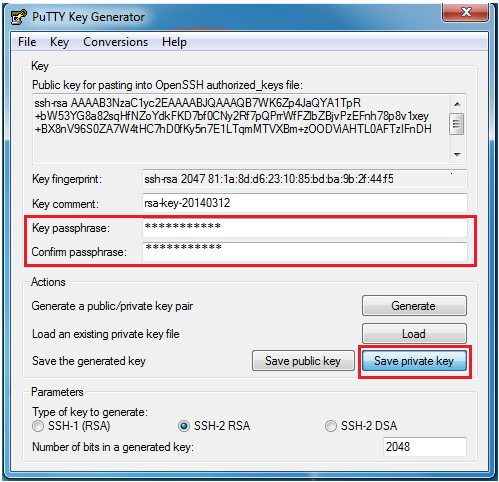
7. Save your Private key. Before saving the private key, you SHOULD provide a ‘Key passphrase’ for added security.
Save the private key in the same location as your public key. Choose the filename for the private key but the ‘.ppk‘ extension should be retained as it is.

puttygen5

Do not close PuTTYgen. Not yet!

Copy SSH Public Key to remote server

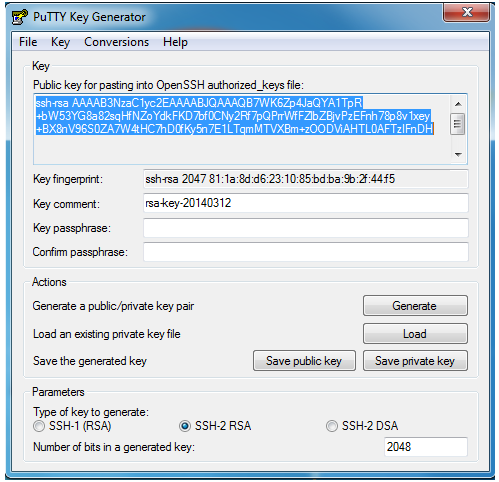
1. Select and copy the public key from the text field (see below) and paste the contents into Notepad (or any text editor). Save the file with an appropriate filename (e.g., publickey.txt) in a location you’d easily remember.

puttygen6

2. Launch PuTTY

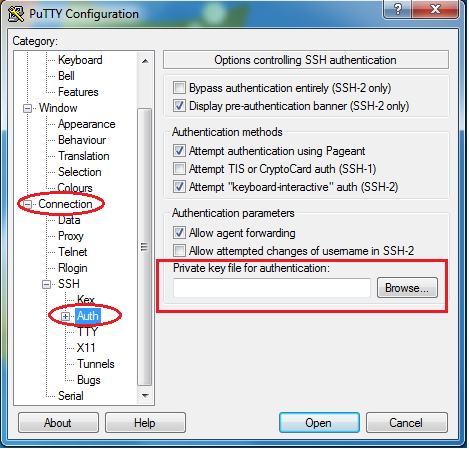
3. In the ‘Category‘ side bar in PuTTY client, navigate to ‘Connection -> Auth’, and then, browse for the private key (.ppk) you saved previously. Press ‘Open‘. The text field will now be populated with the path to your private key.

puttygen8

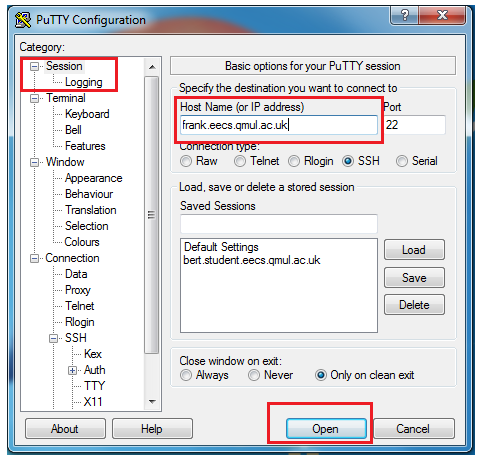
4. Then, navigate to ‘Category -> Session -> Host Name‘ and enter name of the remote server you’d like to connect to:

puttygen7

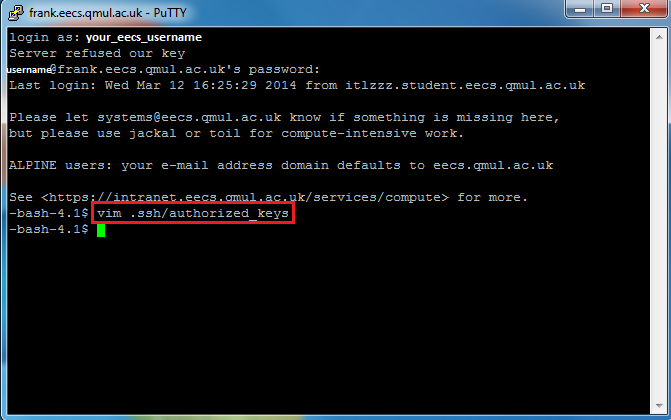
5. Enter the username and password credentials for logging into the remote server, and then type:

$ vim .ssh/authorized_keys

to access the list of authorized keys on the remote host. (You can use nano/emacs editors instead of vi/vim, too)

puttygen9

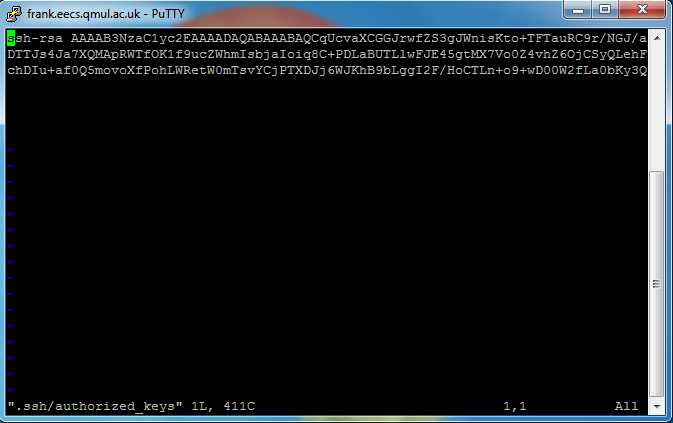
6. When you’ve opened the list of authorized_keys in the remote host, it will look something like below:

puttygen10

7. To this file, copy and paste the contents of the publickey.txt file saved previously (see step 1). Save the ‘authorized_keys‘ file, log out of the remote host and close PuTTY.

SSH agent forwarding

PuTTY uses its own SSH agent, called ‘pageant‘, which will be used for the ‘SSH agent forwarding’.
You will find the executable file in PuTTY’s installation folder. (C:\Program Files\PuTTY).

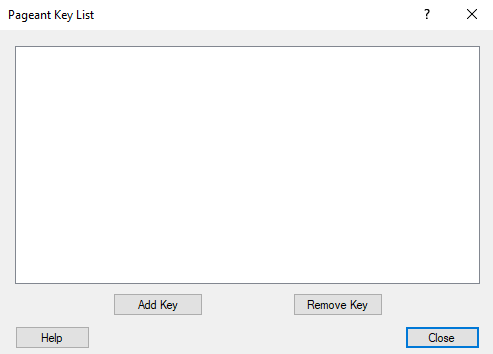
1. Double click on ‘pageant’, it will open in the system tray (bottom right corner). Open it.

pageant_1

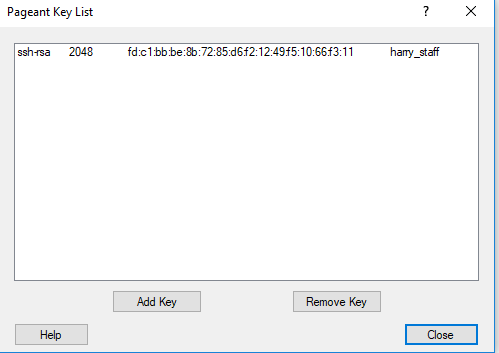
2. Click ‘Add Key’. Find your Private key and click ‘Open’. If you protected your SSH key with a passphrase, you will be asked to enter it.

3. Your SSH key is now loaded on the SSH agent.
pageant_2

Pageant is now running in the background.

NOTE: Going forward, whenever you try to access the remote-host (to which you’ve copied your public ssh key) using PuTTY, you’d be able to login without providing your password. You’d only have to enter your username and passphrase (provided when setting up your ssh key pair) to login.

NOTE: You will ONLY be able to copy your public key to frank (staff/PhD) and not to other compute servers (e.g., canterbury). However, once you’ve copied your public key to frank, you’d then be able to hop on to other compute servers from there.

Mobaxterm

MobaXterm is a recommended free X server and SSH client for Windows, as an alternative to PuTTY. You can download the Home edition here:

https://mobaxterm.mobatek.net/download-home-edition.html

It has its own SSH-key generation tool and its own internal SSH agent, which can be used to forward your SSH keys.

SSH Key generation

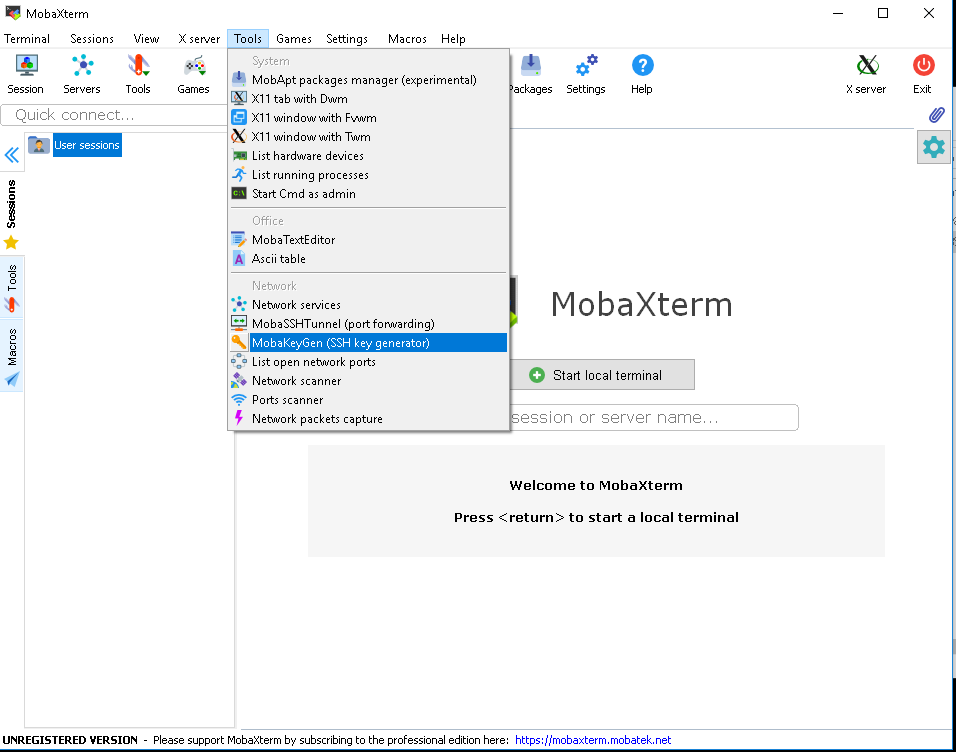
1. Open MobaXterm and go to ‘Tools -> MobaKeyGen (SSH key generator)‘.

moba_1

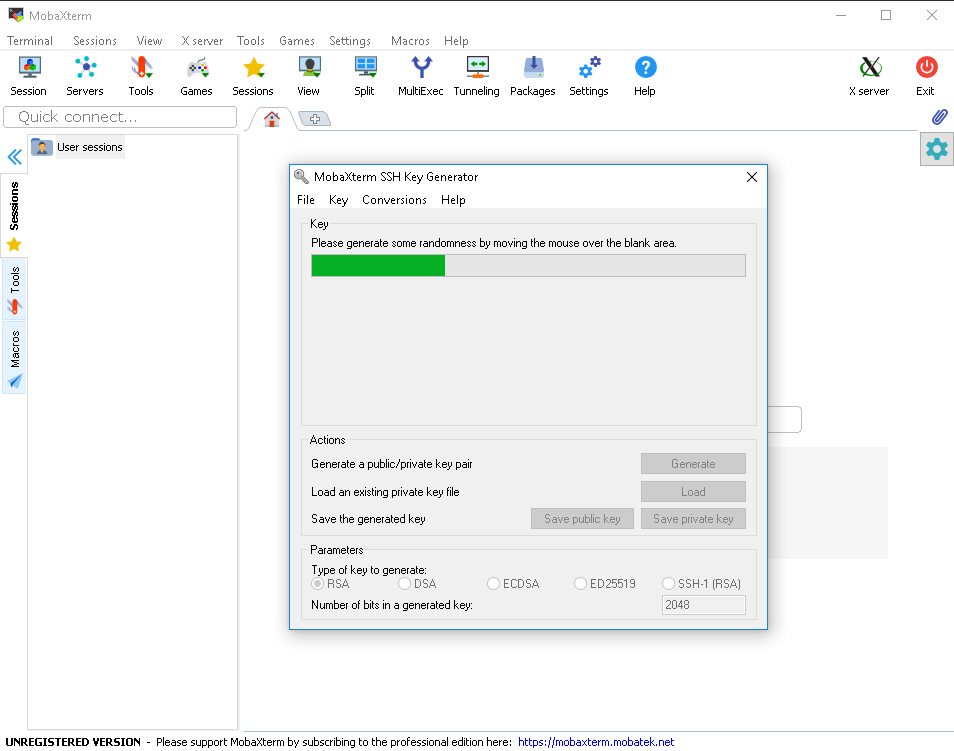
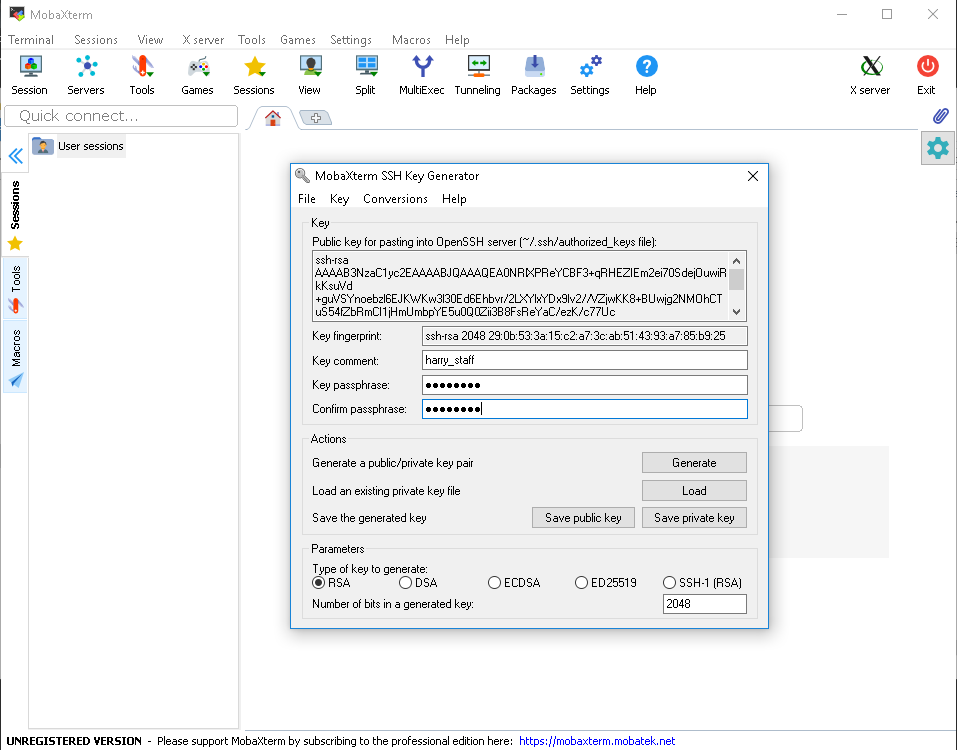
2. Click ‘Generate‘ and move your mouse cursor in the big empty field until the green bar at the top indicates that it is complete.

moba_2

3. Add a relevant comment at the ‘Key comment‘ box and add a ‘Key passphrase‘ to protect your SSH keys.
Click at ‘Save private key‘ and select a location to save your private key.

moba_3

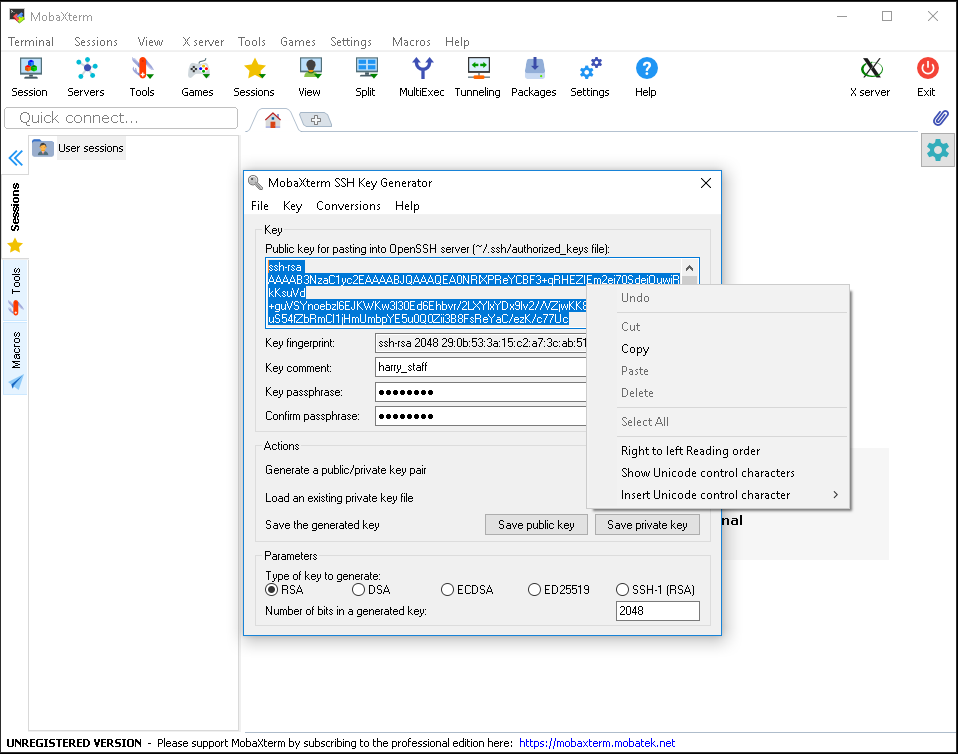
4. Copy your public key from the ‘Public key’ box and paste it into a notepad. Save it in the same folder with your Private key. This will be copied later to the remote server.

moba_5


SSH-agent

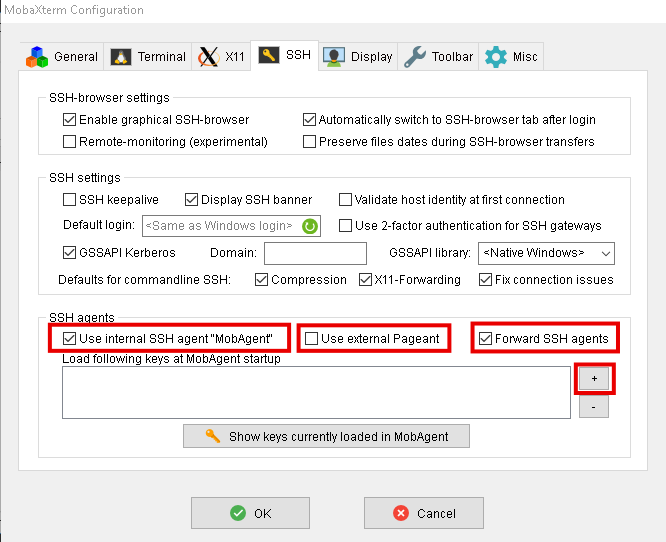
Enable the native SSH agent and append your private key to be loaded automatically. Go to ‘Settings -> Configuration -> SSH‘.

Check the ‘Use internal SSH agent “MobAgent” ‘ and untick the ‘Use external Pageant‘ box.

moba_agent_2

Click the ‘+‘ key at the right side, select your private key and click ‘Open‘. You will the key listed in the white box. Click ‘OK‘. Now your private key will be loaded automatically when you start MobaXterm.

moba_agent_4

Restart MobaXterm if you are asked.


SSH session

If you have completed the above necessary steps, create a new session.

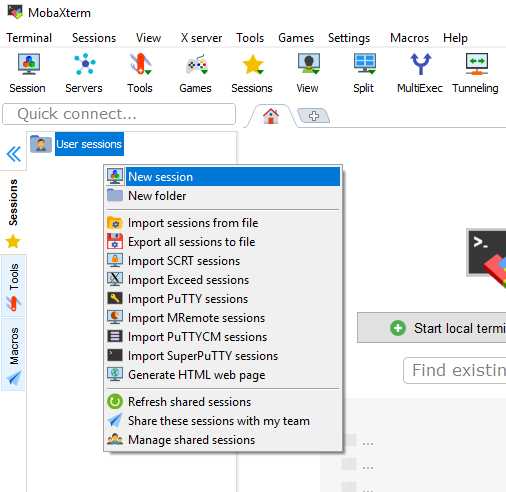
1. On the main screen, open the ‘Sessions‘ tab at the left, right click in the empty area and select ‘New session‘.

moba_session_1

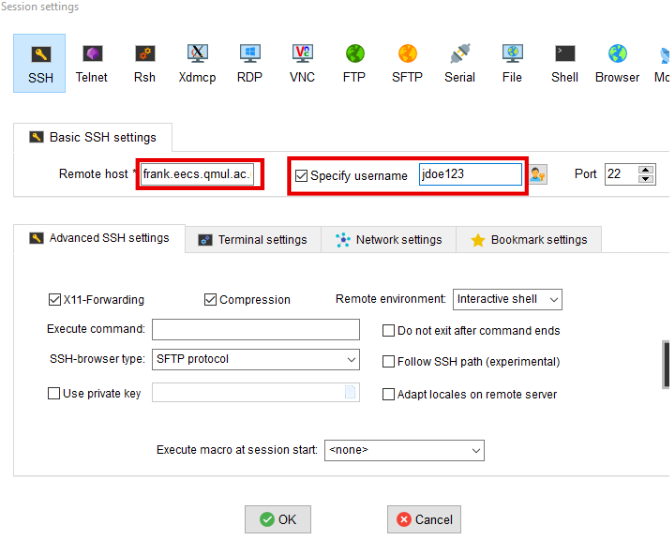
2. Click at the ‘SSH’ button, fill the name of the remote server at the ‘Remote host‘ field, and your EECS username at the ‘Specify username‘ field. Click ‘OK’.

moba_session_2

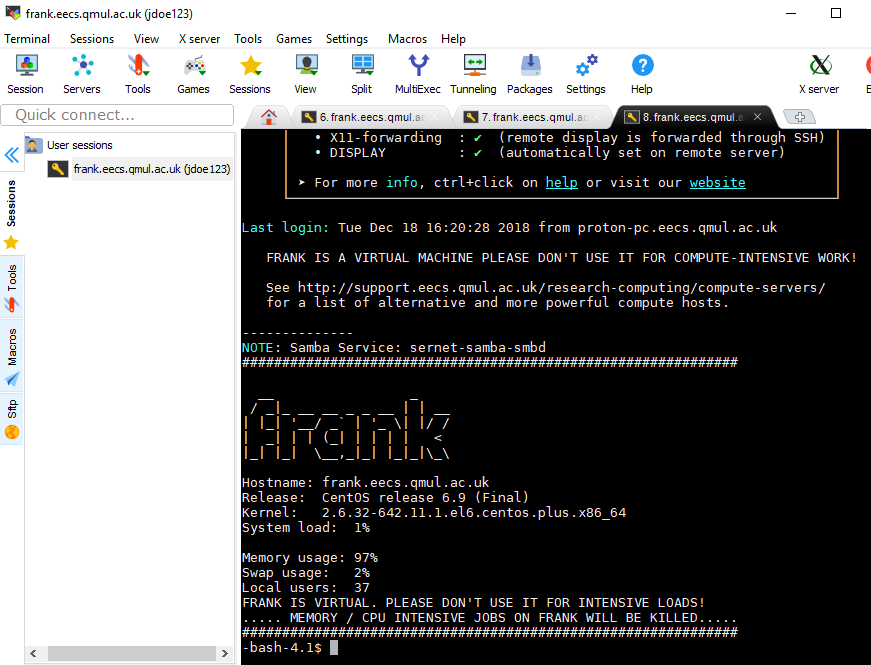
3. Double-click on the new session, this will SSH you into the remote server without entering your password.

moba_session_3

Optional: If you’re using one of the ‘login servers’ to hop on to an EECS compute server, type the following command the check if your SSH agent has forwarded your SSH key in the new session:

[jdoe123@frank] $ ssh-add -L


Linux

Terms

ssh-keygen : Creates the public-private key pair.

ssh-copy-id :Copies the public key into the remote server’s .ssh/authorized_keys file.

ssh-add -l : Lists the SSH-keys in the current connection

Key generation

1. Open a Terminal, type the following command and press enter:

ssh-keygen

2. Follow the instructions to generate the private/public key pair.
Press Enter at the “Enter file in which to save the key” part to create a key using the default name and path.
NOTE: Add a passphrase for security reasons.

$ ssh-keygen 
Generating public/private rsa key pair.
Enter file in which to save the key (/home/harry/.ssh/id_rsa): 
Enter passphrase (empty for no passphrase): ***********
Enter same passphrase again: ***********
Your identification has been saved in /home/harry/.ssh/id_rsa.
Your public key has been saved in /home/harry/.ssh/id_rsa.pub.
The key fingerprint is:
SHA256:dFLmbsDRF7c6accolFOxILVyyxPTCGshT55Uwn54FS8 harry@local-desktop
The key's randomart image is:
+---[RSA 2048]----+
|      ..O+* =+.  |
|       B.%.Bo+ . |
|       .%.%oE o  |
|       ooXo= *   |
|        SoB * o  |
|         . + o   |
|                 |
|                 |
|                 |
+----[SHA256]-----+


From that message you understand that your SSH key pair has been generated:

Private key : /homes/USERNAME/.ssh/id_rsa
Public key: /homes/USERNAME/.ssh/id_rsa.pub

4. Copy public key
Provided you have a QMUL IT account you can add your keys at https://support.eecs.qmul.ac.uk/ssh, if you do not please contact servicedesk@qmul.ac.uk with your public key for the EECS cluster and we will get back to you as quickly as possible.

SSH access

SSH into the server with your keys to make sure it works. If you used a passphrase for your SSH keys, then you’ll be prompted to enter that.

 
$ ssh -i ~/.ssh/id_rsa EECS_USERNAME@LOGIN_SERVER
If the user Joe Doe with EECS Username jdoe123 wants to copy the public key to the server frank.eecs.qmul.ac.uk, he will use:

$ ssh -i ~/.ssh/id_rsa jdoe123@frank.eecs.qmul.ac.uk

MacOS

The instructions for MacOS are the same with Linux to generate and copy the SSH keys, so please follow the Linux  guide.

2018-NOTE: We’ve noticed a BUG in  ‘High Sierra‘  and later, where the ssh key is not being forwarded properly. The solution to that is :

  1. Manually add your Private key
  2. Confirm it’s loaded
  3. SSH into the remote server and check that your SSH key has been forwarded, like:

$ ssh-add ~/.ssh/id_rsa
$ ssh-add -L
$ ssh jdoe123@frank.eecs.qmul.ac.uk -A

[jdo123@frank] $ ssh-add -L


SSH Agent Forwarding

NOTE: If you try to access an EECS Compute Server via a login-server,  you must enable your SSH agent forwarding. To do that on a terminal, append the ‘-A‘ flag at the end of the ssh command, for example:

$ ssh -i ~/.ssh/id_rsa jdoe123@frank.eecs.qmul.ac.uk -A

To confirm that your key is present when you SSH into the login server, type:

[jdoe123@frank] $ ssh-add -L

If your agent forwarding worked fine, the result will be the content of the Public key being used to authenticate against your Public key, for example:

[jdoe123@frank] $ ssh-add -L
ssh-rsa AAAAB3NzaC1yc2EAAAADAQABAAABAQDYSaRizDUt87d8gh8sg78DGHGDGHd8hs87h8hd8sGnAHmYSLrnR4+4DxQH7agZXzgkb4ShlBbB5TfDDhYJMYBMPvjNW7HC8cgycfduNNz0sV1WbQ1GZ5phRw34THM8E6MPnhL/DbqQMe6DOA9+yegsgAQYHo9wE35BSa6hx6UmymuM+nn2M98CrJ /home/jdoe123/.ssh/id_rsa

If you see anything else like a ‘The agent has no identities.’ message, that means you did sth wrong, so read the previous instructions again, step by step.

Add ssh keys to server

Provided you have a QMUL IT account you can add your keys at https://support.eecs.qmul.ac.uk/ssh, if you do not please contact servicedesk@qmul.ac.uk with your public key for the EECS cluster and we will get back to you as quickly as possible.

Fileservers

EECS has a variety of file servers for different purposes. For example, to provide storage for individuals (home directories); for research groups’ papers and other documents (network “shares”) and administrators; for experimental data; etc. These uses are described in the service descriptions on the pages linked to below.

The requirements for these purposes vary – for example, in terms of performance, amount of storage, security/accessibility and backup policy. To help people remember what policies apply to which file services we tend to support differing policies on different servers. Accordingly this document is structured around the servers rather than the services.

There are a variety of ways to access the file servers, including NFS, SMB and SFTP.

See also

Staff Server

The School has upgraded and consolidated its 2 staff file servers into one new one (“tofu.eecs.qmul.ac.uk”) , it uses RAID storage and back-up to tape in different School buildings; It provides home directories to staff and research student users of the dual-boot Windows/Linux managed desktops; It also provide storage, with tape back-up, for each research group (up to 4TB each) for shared documents and code (svn, cvs) repositories. For more information about access methods to these shares please contact systems@eecs.

  • NFS (from a “managed” desktop or a compute server): e.g. /import/imc/, /import/mmv/
  • SMB (from a managed Windows desktop): e.g. \\tofu\IMC or \\tofu\vision

For security reasons, none of the staff servers’ storage is visible on the EECS student service. Instead, members of staff and research students get second home directories on student service machines. These second home directories are visible on the NFS-enabled staff networks as e.g. /homes.itl/keithc/ on a managed Linux machine.


Bulk Research Storage

EECS has a has several RAIDed file servers (“landin”, “orsova” and “oriana”) largely funded by research groups from grant income, with some pump-priming money from School resources. There are many terabytes of storage. It is not taped. Each research group gets just the storage that it funds. There is a considerable RAID tax necessary to achieve reasonable reliability.

For more information see the

Virtual Machines

Being a full(ish) and complete(ish) list of servers and the services hosted on them provided by the school.


VMWare: Virtual machines on the VMWare platform.

hostname purpose
akita drwachestra web server
almanac wiki farm
apple archived
aristotle MAT web server
auth1 Public LDAP server
bagel repository server-  code.eecs
baked archived
bard intranet staging server
beans archived
bentham multi hoost web server
berkeley RIM Website
bert student login server
boniface development school web site
bouncer Windows licence server
brighton Web server
brunost Hadoop node manager
burns Database server
burrito Webserver
buzz archived
calvin web projects infrastructure
camus web server
cathay archived
cheiron “greenpages” web server
chivers database server
conure c4dm web server
diderot FAST project web server – external dev
edam database server
elvira C4DM Cord Website
fabian school web server testing
flanders devdb
frank staff login server
fukuyama web server
garfield Emergency Replacement for Hobbes
gifu web server
glenstorm Tomcat server
graveyard Networks research
grover CentOS 7 student login server
hatch Infrastructure
heideggar Web server
henson Web server
hilarius School web server
hobbes Webprojects Webserver
hobo Windows infrastructure
huevo Windows infrastructure
hume web server
itrinegy-server student projects network emulator
jackdaw web server
jacob infrstructure
jajko student windows DC
kawasaki web server
kawfee archived
keeper Version control repository
kobe Decommissioned 2016/11/1
korra spacewalk database server
kraken Squid host for Networks research
lassie infrastructure
lirecvm lweb server
locke web server
mars NULL
mazdak MMV web server
mill web server
minotaur replacement of theseus
mole mediawiki server
monique infrastructure
mulch NULL
murdoch Print server
nagano coursenotes repository
nagasaki web aplication server
nara web server
nata VM to replace EECS mail server
netemu2 INE Appplicance: network emulator
newswine Windows infrastructure. Migrated from XEN
nietzsche web server
obu web server
ockham web server
oeuf Staff Windows Infrastructure
oita NULL
orkney NULL
osaka osaka
overseer overseer
ovum Infrastructure
peat VM Desktop for SAM Project
pelagius Web server
pele web application server
penfold NULL
penfold Test Machine for new OS Images
pepper SaltStack master
perky perky
petra NULL
pew Blind Mole Rats NoSql Webserver
pewter Secure proxy web server
pinky pinky
plato web server
plato plato
ratty ratty
raven MMV host
rebekah Student printing and Papercut server
rizpah rizpah
roland Subversion and Git Server
rowlf rowlf
rowlf NULL
rupert print release station manager
samproject archived
sartre web server
solder-new archived
spinoza NULL
tacitus Testing website
tardis NULL
telur Infrastructure
tintin Infrastructure testing
toad Drupal farm
tokyo Web server
twistvm twistvm
uggie Infrastructure
vcenter Infrastructure
velcro New VMWare Replacement for Buckle
wellard wellard
williams web server
woody infrastructure
yao Web application server CIS
yokohama Zeebo LAMP server
zorba routing testbed


Compute Servers (For EECs Staff/PhDs Only)

The Faculty of EECS has a large number of Linux-based compute servers (or grunt-servers) available for any type of computational tasks required by today’s Research, and they are accompanied by a large variety of up-to-date Software, IDEs, frameworks, libraries and toolkits.


Servers List

The list shows the available Compute Servers owned by the School and by Research Groups.


Name OS CPU GPU GPU RAM HTT? RAM Cores Owned Access
albans CentOS 7 2 * Intel Xeon 5318Y @ 2 * A100 80 GB Yes 512 GB 96 Hao, Yang Antennas School
agnus CentOS 7 2 * Xeon(R) Gold 5318Y CPU @ 2.10GHz 1 * Nvidia A100 40GB Yes 256 GB 96 Benetos, Emmanouil C4DM
arius CentOS 7 2 * Xeon(R) Silver 4316 CPU @ 2.30GHz 1 * A40 48 GB Yes 256 GB 78 Castro, Ignacio Networks
bath Centos 7 2 * Xeon 5122 @ 3.60GHz 2 * P100 16 GB Yes 192 GB 16 EECS Systems School
bluck CentOS 7 2 * Xeon Gold 5318Y @ 2.10GHz 8 * A5000 24 Yes 256 GB 80 Dixon, Simon C4DM (AIM)
bowers CentOS 7 2 * Xeon Gold 5318Y @ 2.10GHz 8 * A5000 24 Yes 256 GB 80 Dixon, Simon C4DM (AIM)
buxton CentOS 7 2 * E5-2637 @3.5 GHz 4 * RTX 2080 Ti 45 GB Yes 128 GB 16 Dixon, Simon C4DM (AIM)
nemon Ubuntu 24.04 2 * Xeon Gold 5418Y @ 2GHz 3 * Nvidia L40s 48 GB Yes 256 GB 96 Dixon, Simon C4DM
wynne CentOS 7 2 * Xeon Gold 5218R @ 2.10GHz 8 * A5000 24 Yes 256 GB 80 Dixon, Simon C4DM (AIM)
carlisle CentOS 7 2 * Xeon(R) Silver 4112 @ 2.60GHz 4 * GTX 1080 48 GB Yes 64 GB 24 Mazzon Vision (Smart Cameras)
lincoln CentOS 7 2 * Intel Xeon 5318Y @ 2 * A100 80 GB Yes 512 GB 96 Hao, Yang Antennas School
carmathen CentOS 7 2 * Xeon-5115 CPU @ 2.40GHz 2 * Tesla V100 64 GB Yes 128 GB 40 Gong, Sean Vision
chichester CentOS 7 4 * RTX 2080 Ti Yes Gong, Sean Vision
clytemnestra CentOS 7 2 * Xeon(R) Gold 5218R @ 2.10GHz 3 * RTX 6000 69 GB Yes 289 GB 80 Patras MMV
doncaster CentOS 7 2 * Xeon-5122 @3.60 GHz 4 * RTX 2070 32 GB Yes 128 GB 16 Gong, Xiang Vision
dorset CentOS 7 2 * Xeon 5218 CPU@ 2.30GHz 4 * RTX 2080 Ti 45 GB Yes 256 GB 16 Lucas, Simon Game AI
durham CentOS 7 2 * Intel Xeon 5320 @ 2.20GHz 2 * A100 80 GB Yes 512 GB 104 Alomainy, Akram Antennas School
earl-01 CentOS 7 2 * Xeon-4114 @ 2.20GHz Yes 320 GB 40 Uhlig Networks
earl-02 Ubuntu 2 * Xeon-4114 @ 2.20GHz Yes 64 GB 40 Uhlig Networks
earl-03 Ubuntu 2 * Xeon-4114 @ 2.20GHz Yes 64 GB 40 Uhlig Networks
earl-04 Ubuntu 2 * Xeon-4114 @ 2.20GHz Yes 64 GB 40 Uhlig Networks
dgx1-1 Ubuntu 4 * E5-2698 @2.20 GHz 8 * P100 128 GB Yes 512 GB 80 Gong Vision
dorchester Centos 7 2 * Xeon 5122 @ 3.60GHz  2 * P100  16 GB  Yes 192 GB 16 EECS Systems  School
dunstable Centos 7 2 * E5-2660 @ 2.6GHz 1 * M5000 8 GB Yes 64GB 40 Cavallero  CIS
ilkley Centos 7 2 * Xeon E5-2620 v4 @ 2.10GHz 4 * GTX 1080 Ti 48 GB Yes 128 GB 32 Gong, Sean
Vision
kinloch Centos 7 2 * Xeon Gold 6330 @ 2GHz 4 * NVIDIA A40 48 GB Yes 512 GB 112 Poesio,Massimo Cogsci
lichfield CentOS 7 2 * Xeon Gold 6442Y  2 * Nvidia A40  48GB Yes 256 GB 96 Liakata, Maria NLP
lime-01 Ubuntu 2 * Xeon-4210R @ 2.4G 1 * RTX 2080 Ti 12 GB Yes 768 GB 10 Antichi, Gianni Networks
medusa Centos 7 2 * Xeon 5122 @ 3.60GHz 2 * P100 16 GB yes 192 GB 16 I. Patras MMV
monmouth Centos 7 2 * Intel Xeon Gold 5318S @ 2.10GHz 2 * Nvidia A40 48 GB yes 256 GB 96 Liu, Yuanwei CSR
nausicaa CentOS 7 2 * E5-2630L v4 @ 1.80GHz 4 * GTX 1080  32 GB 128 GB  40 I. Patras MMV
naples CentOS 7 2 * E5-2630L v4 @ 1.80GHz 3 * RTX 6000  66 GB 386 GB  80 Purver, Matt CogSci
pandora CentOS 7 2 * Xeon Gold 5218R CPU @ 2.10GHz 8 * RTX 3090  192 GB 258 GB  80 I. Patras MMV
penelope CentOS 7 2 * E5-2630L v4 @ 1.80GHz 4 * GTX 1080  32 GB 128 GB  40 I. Patras MMV
sanctus CentOS 7 2 * Xeon Gold 5218  3 * Nvidia A30  24GB Yes 384 GB 40 Liakata, Maria NLP
venice CentOS 7 2 * E5-2687W v4 @ 3.00GHz 3 * GTX 1080Ti 36 GB 384 GB 48 Poesio,Massimo CogSci (DALI)
whitby CentOS 7 2 * Xeon Gold 5218R @ 2.10GHz 3 * RTX 6000 69 GB Yes 289 GB 80 Dixon, Simon C4DM

Access

Users can access the servers based on the “Access” field in the above list.

  • School: Open access to all Research members
  • <Research Group Name>: Access to members of that Research Group

Users can access the servers via SSH. Access to servers owned by Research Groups may be granted by an official request to the Group’s supervisors.

Some servers my have restricted access only to members of a Research Group working on a Research Project and will be displayed on the above table.

Shares

The following Shares are available to all Compute Servers (and Managed Desktops):

Home folder

Your EECS home directory is available to all Compute Servers and the ‘login servers’. You can write data into your home directory from Server A and they will also be available on Server B.


Group Shares

Group shares are available on all Compute Servers and ‘login servers’ via NFS. Typically, they can be accessible via the /import/$GROUP_SHARE_NAME, by the members of a Research Group.

For example, to access the Group Share named ‘demo-groupshare-1‘, you can access it from any Compute Server or Linux Managed Desktop via /import/demo-group-share-1 . In this example, you will be able to access that group share, only if you are a member of the ‘demogroup‘, as seen from the Group Permissions:

harry@exeter ~ $ ls -lha /import/demo-groupshare-1/
total 1.5M
drwxrws---.   4 harry demogroup 4.0K May  1 15:39 .
drwxr-xr-x. 119 root  root       0 May 10 11:48 ..
drwxr-xr-x.   2 root  demogroup 4.0K May  1 11:37 DATASETS

For the creation of a new Group Share, please raise a HelpDesk Ticket, detailing the reason and the requirements for that Share.

Software Share

Software, IDEs, packages, libraries etc are available on the compute servers either locally (based on past Requests) or centrally in the /import/linux/ Software Share. This software share is available to all Compute Servers and Managed Desktops in EECS and it is available via NFS.

Applications installed inside that Software Share may also be available as custom binaries on all Servers and Desktops, which, when users execute them, prepares the user’s environment accordingly and launch the intended application.

Most of the libraries and toolkits available in the ‘/import/linux’ Software Share are also available via the environment modules, for ease of use.


harry@exeter ~ $ ls /import/linux
android-studio                  erlang              opencv
atk                             feko                python
batik                           tensorflow          matlab
cuda                            ...                 ...
...
...


Usage

NOTE: You should not run compute-intensive processes on the ‘login-servers’ like ‘frank.eecs’ or ‘login.strudent’. Such jobs that exhaust the resources of those machines will be killed without any warning!

Use nice to make your long-running jobs give way to lower-latency jobs (like text editors..). The nice value you use should be proportional to the amount of time you expect your job to run. Given in practice the longest-running job will always finish last anyway, it’s polite not to make text editors unnecessarily slow.

Useful applications are screen and tmux, which allow you to detach from a long-running terminal, leave a task running at the background and re-attach to it later. This way, if you suddenly lose your network connection to the server unexpectedly, your processes won’t quit and your Session will still be alive.


Student Printing

These instructions do not apply to EECS PhD students.

Student printing is provided supported by QMUL IT Services.

General information on student printing can be found here.

To print from an EECS Student PC in the labs (ITL, Electronics Lab) :

  • If you are on Windows, use the printers named konicacolour or konicabw
  • If you are on Linux, use the printer named KONICA_RELEASE_ITL

To print from your own laptop/ device visit https://eprint.stu.qmul.ac.uk. Please log in with your QM account, i.e. the one you use for your e-mail. Further information on this service is provided here.

You will need to register your student card to be able to release jobs, as explained on this page.