Screen

Intro

Screen is a tool you can use to keep a session open on a server while you’re not logged in, this allows you to run long running jobs in the background without the fear of it exiting once you do eventually log off, are kicked off due to a network issue, etc.

Running/Detaching a Screen Session

To open a screen session all you have to is type ‘screen’ on the command line, this will open a new interactive session.

$ screen

All you need to do now is run your job and once that’s done you need to detach the screen, this will cause it to run in the background uninterrupted, to do this all you need to do is press ctrl+a d – (which is read ctrl and the letter ‘a’ together, and d after letting go of ctrl and ‘a’). This will lead you back into your previous non-screen session.  Now you can exit the server and the screen session will still be running.

Managing a Screen Session

Now to manage your screen session all you need to is type the following ‘screen -ls’

$ screen -ls
There is a screen on:
2431.pts-15.host (Detached)
1 Socket in /var/run/screen/S-user.

This will list all the current Screen sessions you have opened, to reattach on to the session again, all you need to do is type ‘screen -r’ if there is one screen session open or you can be more specific (helpful when you have multiple screen sessions open) ‘screen -r 2431’

$ screen -ls
There are screens on:
3273.pts-15.host (Detached)
2431.pts-15.host (Detached)
2 Sockets in /var/run/screen/S-user.

$ screen -r 2431

Killing a Screen Session

To kill a screen session you can either exit from the screen session itself or type the following ‘kill 2431’ where 2431 is the process number of the screen session

$ screen -ls
There are screens on:
3273.pts-15.host (Detached)
2431.pts-15.host (Detached)
2 Sockets in /var/run/screen/S-user.

$ kill 2431
$ screen -ls
There is a screen on:
3273.pts-15.host (Detached)
1 Socket in /var/run/screen/S-user.

Disclaimer

Always make sure to kill screen sessions if they’re not in use or it affects the server’s performance, and do not run this on the jump servers.
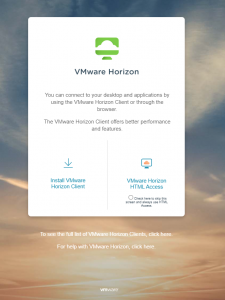
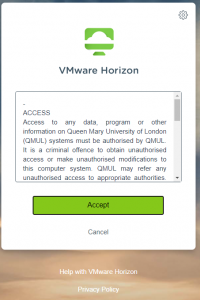
AppsAnywhere – How To Access


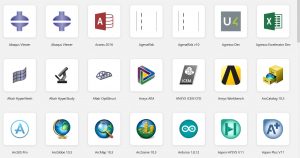
AppsAnywhere is a platform which gives access to the most commonly used software packages. This avoids the need to install the programmes locally.

To access AppsAnywhere via web you will need to go to the university Appsanywhere website using your web browser e.g. Chrome / Internet Explorer.


Type in; https://appsanywhere.qmul.ac.uk in to the address bar on your web browser.

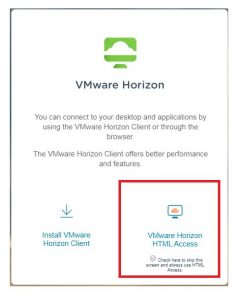
Click “Vmware Horzion HTML Access” will prompt you to accept access to the platform.

Press “Accept“.

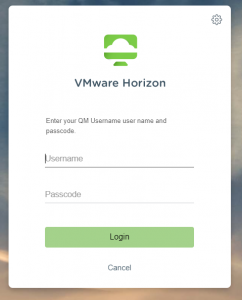
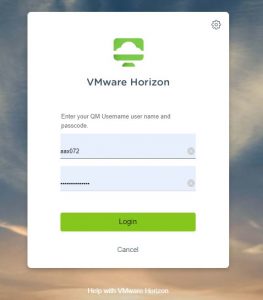
You will now be presented with a a logon screen.


Enter your university username and a passcode which you should have received to your mobile phone.

If you yet to have setup MFA (Multi Factor Authentication) to receive a passcode to your mobile phone do follow this guide MFA before proceeding on with Appsanywhere login


METHOD 1

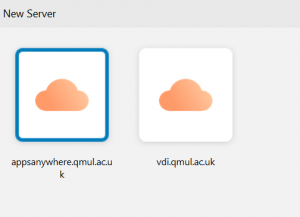
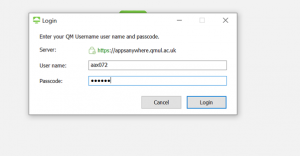
Log on to VM Horizon Client using your ITS credentials by right clicking and selecting the appsanywhere.qmul.ac.uk server and connect. If it is not present, go to the top left-hand corner and select new server and manually enter the server name. Should you need to actually install VMHorizon then please go to for detailed instructions.

https://www.its.qmul.ac.uk/services/staff/appsanywhere/


You will now be prompted to enter a passcode. This can be found by opening Authenticator on your mobile device and manually entering the code and then accept on your mobile device Should you not have this already, it can be obtained by contacting servicedesk@qmul.ac.uk .


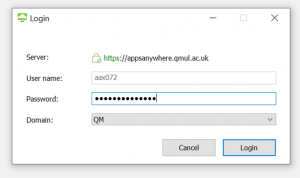
You may get an error message on screen but ignore this and now enter your ITS password also ensuring that the domain is QM. If you have forgotten your ITS credentials or password, then this can be solved by contacting servicedesk@qmul.ac.uk.


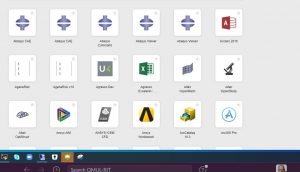
You will now be taken to the AppsAnywhere GUI. To open any of the packages, simply double click on it.


METHOD 2


This a web based access to AppsAnywhere. To access it, go to:-


https://appsanywhere.qmul.ac.uk/portal/webclient/index.html#/


Click select

And  then select the right hand option VMWare Horizon HTML Access


Once there you will see the below and enter your ITS details


Enter your ITS credentials here and also open the Authenticator on your mobile device and click accept connection on your mobile. You will now be directed to the AppsAnywhere GUI page. You can open any application by double clicking on it or you can search for the software via the search option at the top of the screen.


Anaconda

Anaconda is the world’s most popular Python/R data science and machine learning platform. It contains more than 7,500+ Python/R data science packages, it has become industry standard platform for developing, testing Python/R applications and for Deep Learning.

Versions

All Anaconda versions are available as environment modules. We provide only Anaconda with Python 3 support since Python 2 reached its End of Life and the latest Machine Learning tools have minimal or no support for Python 2.

We recommend using the Anaconda we provide as environment module, over custom installations in your home directory, cause it offers more control on your local environment.

Many users that have built anaconda manually at their home directories, have reported major issues affecting their EECS Desktop Environment


Usage


Loading the module

To use the default (latest) version of Anaconda:

$ module load anaconda3

Check the versions

$ conda --version
conda 4.7.12

$ python -V
Python 3.7.4

Create a new environment

Create a new Conda environment with a custom name after the -n option:

$ conda create --quiet --yes -n mycondaenv

List conda environments

$ conda env list
# conda environments:
#
mycondaenv /homes/$USER/.conda/envs/mycondaenv
base * /import/linux/anaconda/3/2019.10

Your new environments is listed and also note the * at the ‘base’ environment, it indicated the current active environment.

Activate the environment

To activate your conda environment and start installing packages:

$ source activate mycondaenv
(mycondaenv) $

Install packages

To install a package with its dependencies in your conda environment:

(mycondaenv) $ conda install <package_name>

List installed packages

To list the available  packages in your current activated conda environment:

(mycondaenv) $ conda list

Deactivate the environment

To stop using the conda environment and exit to your regular shell:

(mycondaenv) $ source deactivate


References

Python

Requirements:

  • Environment Modules

The guide assumes basic understanding of the above requirements

Python is a general-purpose, versatile and popular programming language. It’s great as a first language because it is concise and easy to read, and it is also a good language to have in any programmer’s stack as it can be used for everything from web development to software development and scientific applications.


Versions

The following versions are available on EECS Servers and Desktops:

Version Available as
Binaries PATH
2.7 Default system version /bin/python
3.4 RPM package, Environment module /bin/python3.4
3.6.9 Environment module /import/linux/python/3.6.9/bin/python
3.6.10 Environment module /import/linux/python/3.6.10/bin/python
3.7.7 Environment module /import/linux/python/3.7.7/bin/python
3.8.2 Environment module /import/linux/python/3.8.2/bin/python

Using Python

The versions in the table above are available as environment modules, that enables users to load and switch between different Python versions with just one command.

For example, if you need to use the provided Python 3.6.10 , from the command line:

$ module load python/3.6.10

To check the version of the Python you are now using:

$ python -V
Python 3.6.10

Installing Python packages

Users do not have “admin” priviliges to install Python packages on the EECS systems, but any Python packages can be installed inside a user’s home directory with more than one ways. We recommend using virtualenv for more efficient workflow.

Choose any tab to how you can install Python packages in your home directory:


Virtualenv give the ability to create isolated Python Virtual Environments with specific packages and different versions for every project you are working on. Python Virtualenv helps keeping  the unique dependencies for every project separate, locally and in an isolated folder with the same name of the virtualenv.

To work with a specific  virtualenv, you must “activate” and when you’ve finished you have to “deactivate” it.

Load the module

First, load the Python versions of your choice from the available environment modules . For example, to use Python 3.6.10:

  $ module load python/3.6.10

Check that you loaded the right Python version:

$ python -V 
Python 3.6.10

Create the virtualenv

To create a virtualenv:

$ python -m venv <venv_name>

That will create a folder with the name you provided above which contains your new Python virtualenv.

$ ls <venv_name>/
bin include lib lib64 pyvenv.cfg

Activate the virtualenv

To activate and start using the new virtualenv:

$ source <venv_name>/bin/activate
(<venv_name>) $

You will notice that your prompt has changed and the name of the activated virtualenv has been added at the beginning of each line. That shows that you have successfully activated the virtualenv and its name.

Now you can start installing your own packages.

Install a package

To install a Python package, simply run:

(<venv_name>) $ pip install <package_name>

To install a specific version of a package you must define it like:

(<venv_name>) $ pip install <package_name>==<version>

Deactivate virtualenv

To stop using the current virtualenv:

(<venv_name>) $ deactivate
$

Anaconda is an open-source distribution of Python and R for scientific computing. It provides an easy way to manage the Python packages you install and the virtualenv you create.

For more info on how to install Python packages using Anaconda, read our Anaconda Guide.

Python packages can be installed to your $HOME directory by adding the --user option. This requires to manually update your local SHELL to point at the location of the installed binaries and libraries.

Load the module

First, load the Python versions of your choice from the available environment modules . For example, to use Python 3.6.10:

  $ module load python/3.6.10

Install a package

To install a Python package,  run:

$ pip install --user <package_name>

It will install the contents of the package at:

• Binaries: $HOME/.local/bin

• Modules/Libraries: $HOME/.local/lib/pythonX.Y/site-packages

Update local environment

Depending on your local environment variables, you might need to add at least the following (replace X.Y with the Python version you used to install the packages):

$ export PATH=~/.local/bin:$PATH
$ export PYTHONPATH=​$HOME/.local/lib/pythonX.Y/site-packages:$PYTHONPATH

References


Tensorflow

Requirements

Make sure you have enough available disk space in your home directory: Disk quotas

This guide assumes you are already familiar with:

Info

TensorFlow is an end-to-end open source platform for machine learning. It has a comprehensive, flexible ecosystem of tools, libraries and community resources that lets researchers push the state-of-the-art in ML and developers easily build and deploy ML powered applications. For information and usage, please read the official documentation: Learn Tensorflow

TensorFlow 1.x uses separate packages for CPU and GPU support, tensorflow (non-GPU dependent) and tensorflow-gpu(requires CUDA/cuDNN).

TensorFlow 2.x is released with both CPU and GPU support.

Install tensorflow

This example uses Anaconda to install tensorflow-gpu==1.15 inside a Python 3.6.10 virtual environment with the name dev_tensorflow_1, using CUDA-10.0 with cuDNN-7.5.9

Click on any tab to find how to install tensorflow using different methods.

Loading the module

Load any of the available Python versions we provide, in the form of environment modules . For example, to use the available Python 3.6.10:

  $ module load python/3.6.10

Check the Python version:

$ python -V 
Python 3.6.10

Loading CUDA

Load the combination of CUDA/cuDNN that is suitable for you. For example:

 $ module load cuda/10.0-cudnn7.5.0

Create the environment

Create a new Python Virtual environment (venv) and define a name, for example to create a venv with the name dev_tensorflow_1:

$ python -m venv dev_tensorflow_1

Activate the environment:

 $ source dev_tensorflow_1/bin/activate
(dev_tensorflow_1) $

Install packages

Install the tensorflow version you need:

(dev_tensorflow_1) $ pip install tensorflow-gpu==1.15

To check the version of tensorflow you just installed:

(dev_tensorflow_1) $ python
>>> import tensorflow as tf
>>> print(tf.VERSION)
1.15.0


Loading the module

To load the default installed version of Anaconda (Python3), load the anaconda3 module:

$ module load anaconda3

Check the Python version:

$ python -V 
Python 3.7.4

Loading CUDA

Load the combination of CUDA/cuDNN that is suitable for you. For example:

 $ module load cuda/10.0-cudnn7.5.0

Create the environment

Create a new Anaconda environment and define a name, for example to create an environment with the name dev_tensorflow_1:

$ conda create --yes --quiet --name dev_tensorflow_1

Activate the environment:

$ source activate dev_tensorflow_1
(dev_tensorflow_1) $

Install packages

Install the tensorflow version you need:

(dev_tensorflow_1) $ conda install tensorflow==1.15

Check the installed packages:

(dev_tensorflow_1) $ conda list

Check the installed tensorflow version

(dev_tensorflow_1) $ python -c "import tensorflow as tf; print(tf.VERSION)"
1.15.0


References

Anaconda and Miniconda for Research

The latest versions of Miniconda 3 and Anaconda 3 are now available to all EECS Research Servers and Managed Linux Desktops, as environment modules.

We have been recommending against the usage of anaconda in our infrastructure for quite a while, since it was breaking the user’s desktop environments on the desktops when it was used incorrectly, making it hard for the users to recover from that bad state. Using Anaconda and Miniconda as environment modules, gives more control to the user on how, when and where anaconda environments will be initialised, removes the need to initialise the user’s shell with anaconda and removes the complexity of manually modifying your SHELL via the .bashrc file.

Read More

Environment modules

Environment modules allow developers (and students) to change the necessary environment paths in a user’s Shell in order to use a particular version of a software with the necessary libraries required (among other things). That means, for example, that when the default java version on the system is 1.7, you can load the env. module for Java 1.8 with 1 simple command and you can start using Java 1.8 for your project.

Both research and student desktops and servers have a large number of environment modules available for usage. Student desktops will have for the new academic semester a bigger collection of modules to use.

How-to

To list all the available modules, run:

 $ module avail

To show what the module will change in the user’s environment, type:

$ module show MODULE_NAME

To load an environment module, type:

$ module load MODULE_NAME

To list the currently enabled modules, type:

$ module list

To unload a module, type:

$ module unload MODULE_NAME

To unload ALL active modules, type:

$ module purge


Databases

We currently provide three Database Management Systems (DBMSs) for student use. All three DBMS run on a single server, dbprojects.eecs.qmul.ac.uk, and can be accessed using command-line clients (e.g. sqlplus/mysql/psql) or JDBC clients from various machines within the college.

To create an account on any of the school database servers please follow the setup links below.

Name Version Details Setup Required for
Mysql 5.5 www.mysql.org https://webprojects.eecs.qmul.ac.uk/info/details.php ECS417U
Oracle 11G R2 www.oracle.com https://webprojects.eecs.qmul.ac.uk/info/details.php ECS613U ECS716P
Postgres 8.4.20 www.postgresql.org https://webprojects.eecs.qmul.ac.uk/info/details.php ECS519U ECS740P

The following modules make use of the above Databases, for more info check the lecture notes and the instructions on your webprojects page.

This course uses a PHP enabled web server: http://webprojects.eecs.qmul.ac.uk/ This provides the full LAMP stack, including MySQL and optionally Postgres or Oracle. To set up an account go to https://webprojects.eecs.qmul.ac.uk/info/details.php

Students on this course will require an account on the postgres database server. To set this up go to https://webprojects.eecs.qmul.ac.uk/info/details.php
Students on this course will require Oracle accounts. To set this up go to https://webprojects.eecs.qmul.ac.uk/info/details.php
There is a Twitter database (1% feed) available for project work. Raise a Helpdesk Ticket if you want to use it. More documentation will follow on the IMC wiki.
hird year and other project-based courses can take advantage of any of this infrastructure. If you need anything other than that provided through https://webprojects.eecs.qmul.ac.uk/info/details.php please raise a Raise a Helpdesk Ticket as early as possible in your project and we will do our best to assist.

Software

The School uses a lot of open source software and some proprietory software. All of it comes with licensing restrictions, ranging from highly restrictive (e.g. Matlab, MS Office) through the GPL to the very open (e.g. various BSD licensed programs).

The School has MS Office in its teaching laboratories, but we also install Libre Office, which is free to download and cross-platform.

The College also licenses proprietory software which we are able to use, e.g. Endnote.

As much as possible, we purchase “concurrent licences” – these allow a specified number of people to use the software simultaneously, but are much cheaper than a site license (everyone in EECS could use it) and more convenient than individual licenses (particular named people can use it).


You will find bellow more information for a number of the software available in  EECS Desktops and/or Servers:

MATLAB

Oxygen XML Editor

LaTeX

LabView


Labview

The University has National Instruments Academic Suite site license for staff and students. This license provides use of Student edition of LabView which you can use for instrument control, data acquisition and monitoring.

Installation

Before installation please make sure that you have a valid National Instruments account.

You can obtain the software in the following ways:

  • Download LabVIEW Student Edition Software Suite from here
  • Download LabVIEW and Toolkits individually from here
  • Search for the products and download individually from here

During the installation please use the following student install serial number:

Please note that the above serial number is valid only for one year.